Leah Tackles

  • Home
  • About
  • Policy
  • Beauty
  • Fashion
  • Cooking
  • Exercise
  • DIY Projects
  • Decor
  • Book Club
  • Family

DIY Holiday Wreath Tutorial!!!

November 10, 2014 & 3 Comments

Hi there! Happy Monday!!

I hope that you all had a great weekend! We had our first “real” snowfall here and Hailey is pretty sure it’s because of the snow dance that she did ; ) Last year my friend posted on Facebook a picture of a beautiful wreath that she made, and I have wanted to make my own ever since. I am super excited to be sharing this tutorial with you today!! I love this project because you can absolutely make it your own and use it for any occasion! You can put bulbs all around the wreath if you prefer that look, and you can use different ribbon, like a burlap style, to completely change the feel of this wreath!

WHAT YOU’LL NEED AND WHAT I SPENT:

diychristmaswreath-leahtackles.jpeg

*Note: I purchased all of my supplies at Hobby Lobby but did it when all Christmas was 50% off…never buy stuff at Hobby Lobby full price!! The next wreath I make I plan to try getting supplies from Dollar Tree

Styrofoam Wreath $5

Red Ribbon $5

Wooden Letter $3

3 Different Sizes of Plastic/Shatterproof Bulbs $11

Holly and Pom Pom Accents $4

Hot Glue Gun

Total Spent: About $30

Step 1:

Wrap the ribbon around wreath and secure as you go with hot glue.

christmasbulbwreath-leahtackles.jpeg

Step 2:

Begin gluing the bulbs with the part that you would use to hang the ornament facing the back of your wreath. Glue the first few bulbs on the inside of the wreath and then the outside. I glued the bulbs to the wreath and also to the bulbs they were next to.  I used the largest bulbs for this step.

diychristmasbulbwreath-leahtackles.jpeg

christmaswreath-bulbwreath-leahtackles.jpeg

Step 3:

Start fitting more bulbs into the gaps and glue them as you go. Do not panic if it doens’t look great right away, I was really worried about mine but ended up LOVING the end result.

Step 4:

Glue your letter (or whatever other embellishemnt you like!) to the wreath and add your accent pieces. I had to cut my accent pieces with wire cutters before gluing them onto my wreath.

Step 5:

Hang up your gorgeous new holiday wreath!!

diychristmasbulbwreath-leahtackles.jpeg

If you make this PLEASE PLEASE post a picture to Instagram with the hashtag #LeahTacklesChristmas or share it on my Facebook! And definitely, pin this post! It would mean a lot to me : ) Have a wonderful week!!

FacebookTwitterEmailPinterestShare

Filed Under: DIY Projects Tagged With: Christmas Bulb Wreath, Christmas Wreath, DIY Christmas, DIY christmas wreath, DIY Holiday wreath, Do it yourself wreath, holiday wreath, inexpensive christmas wreath, leah tackles

HALLOWEEN GLOW STICK DIY FAVOR WITH FREE PDF FOR TAG!!

October 27, 2014 & Leave a Comment

Hi there! Happy Monday!

Welcome and thank you as always for reading! If you like today’s post, please “pin” it to your pinterest account (hover over any picture until the “pin” button appears) or share it!! I want to share a fun last minute halloween DIY that make perfect favors for kids to pass out at school, pass out to trick-of-treaters, or have at parties. These take almost no time, and are very inexpensive! I found my glow sticks at Dollar Tree, so I was able to make these for her whole class for less than $20. I love that these are something kids will love, but also add an element of safety when out when it’s getting dark.

HALLOWEEN GLOW STICK DIY FAVOR:

What You’ll Need:

halloween-glowstick-DIY-favor.jpeg

a-bit-of-light-for-halloween-night-leahtackles.jpeg

Glow sticks (*Note: I kept my in the package because I thought my daughters 3 year old class would crack them right away if opened)

White card stock

Free halloween glow stick favor tag PDF

Paper cutter or scissors

Scotch tape

Step 1:

Print the free halloween glow stick favor tag PDF

Step 2:

Cut out the tags

Step 3:

Tape the tags onto the glow stick packages and you’re all done : )

halloweenglowsticks-preschoolhalloweentreat-leahtackles.jpeg

That’s it! Quick and easy! I hope that you enjoy this and if you try it out please let me know or share a picture on facebook or instagram! Have a great start to your week!

FacebookTwitterEmailPinterestShare

Filed Under: DIY Projects Tagged With: free halloween favor tag PDF, halloween 2014, halloween DIY, halloween favors, halloween glowstick DIY, halloween glowsticks, halloween preschool favor, halloween safety glowsticks, halloween treats, leah tackles, Lifestyle Blogger

Leah Tackles CHRISTMAS! Series Intro!!

October 8, 2014 & 4 Comments

Hi there! Happy Wednesday!

Okay, I know, it’s only October, but I want to introduce my Christmas series now so that if things I share interest you, you’ll have plenty of time to do them before the holiday season really creeps up on us!! I want to share gift guides, how I plan, DIY projects, how I budget, how I put aside extra money for the holidays, Elf On the Shelf ideas, holiday fashion, holiday traditions…the list goes on! If there are things you are interested in or would like to suggest that I post on, please let me know! I want to do what you want to read : )

Today I want to share where I start every year with my holiday planning: lists!


#1 iPhone Notes (or similar phone app)

christmaslistorganization-leahtackles.jpeg

I use the notes feature on my iPhone all year long and if I see things that the kids love, if they mention toys to me, or if I randomly think of something it goes onto a note on my phone. I don’t do anything fancy with these notes, but they a good basic that I start with every year as I begin to shop.

#2 Paper Lists for EVERYTHING

*Note: These pages are EXAMPLES and I have not included all of my lists or my lists in their entirety.

organizechristmaswithlists-leahtackles.jpeg

I use a large legal pad or notebook to write out a list the old fashioned way for EVERYTHING Chirstmas you could imagine. Here are some of the things I like to make lists for:

-Gift ideas

-Who we need gifts for

-DIY projects I want to do

-Recipes I want to do

-Elf On the Shelf ideas

-Decoration ideas

-“To-Buy” list for Christmas items we need that are not presents (ie: lights, decor, cookie cutters, etc)

#3 Buying Timeline List

I know some people buy a year in advance, some do it ALL on Black Friday, and some people do it the last shopping days before Christmas…and none of those are wrong! There is no wrong way to shop, you just have to figure out what works for you, your budget, and your family. For me, I like to slowly pick things up as I go but do the majority closer to the holiday. I also will store gifts that the kids may have recieved for birthdays or the Christmas before but weren’t quite ready for, because those make great gifts as well.

#4 Christmas Outfits List

I like to begin planning our Christmas outfits in fall so that I have plenty of time to gather what we need and it doesn’t break the piggy bank. I may do a seperate post on Christmas fashion, but for the most part in our family we do this:

-Christmas Eve Outfits (these are our dressy outfits)

-Christmas Outfits for Santa and other holiday events

-Christmas Jammies…oh yes, we are those people!

And just for fun, here are some pictures of some of our projects AND memories from Christmas 2013 : )

hannaandersonchistmasjammies-leahtackles.jpeg

christmaseveoutfit-leahtackles.jpeg

santa2013-leahtackles.jpeg

thebesthotcocoa-leahtackles.jpeg

elfontheshelfidea-leahtackles.jpeg

elfontheshelfideas-leahtackles.jpeg

I hope that you don’t think I’m *too* crazy for titling a post about Chirstmas already and that you enjoyed this : ) Please don’t forget to let me know what you’d like to see for Christmas or holiday posts by commenting (click the link by the title of this post!).

FacebookTwitterEmailPinterestShare

Filed Under: Cooking, Decor, DIY Projects, Family Tagged With: chirstmas lists, chirstmas outfit ideas, chirstmas prep, chirstmas shopping, christmas 2014, christmas recipes, elf on the shelf ideas, how to organize this christmas, leah tackles, organized christmas

Easy DIY Halloween Treats! Part 1 of 2

October 6, 2014 & Leave a Comment

Hi there! Happy Monday!

With only a few weeks left until Halloween I wanted to share some easy, festive, and tasty treats with you today! I really like all of these because you don’t have to do any baking…you’re just piecing together the ingredients to make a fun fall treat. These recipes are great for little ones, and my 3 year old LOVED helping me make these!!  If you make any of these, please share pictures with me! All of my social media links are below : ) And I would love if you “pinned” them on your Pinterest as well!

#1 Spider Crackers

spidercrackersforhalloween-leahtackles.jpeg

What You’ll Need:

Ritz crackers or similar circle cracker

Small pretzel sticks

Rasins (chocolate chips are fine for those who don’t like rasins)

Peanut butter (or cream cheese or frosting if you have nut allergies or dislike peanut butter like my 3 year old…crazy I know!!)

Directions:

Spread a small amount of the peanut butter onto a cracker and place 4 pretzels on each side to create your spiders legs. Then put a little bit more peanut butter ontop of the “legs” and cover with another cracker. Use the peanut butter to attach the spiders eyes. My 3 year old insisted that one of our spiders also needed a mouth : ) These are a yummy and fairly  healthy treat.

#2 Frankenstein Pudding Cups

frankenstein-pudding-cups-leahtackles.jpeg

What You’ll Need:

Vanilla pudding

Green food coloring

Oreo cookies

Black permanent Marker

Clear small plastic cups

Directions:

Dye your pudding until it’s a green of your liking. Crush your oreos (I just place mine in a plastic baggie and smash! But a food processor also works well). Draw your best frankenstein faces onto the cups with your marker…be sure to have fun with it! Scoop the green pudding into your cup and then top with the crushed oreos. Stick these in the fridge if you don’t plan to eat them right away : )

#3 Jack-O-Lantern Orange Cups

orangefruitcupjackolantern.jpeg

What You’ll Need:

Orange fruit cups (peaches or mixed fruit cocktail will also work, but oranges are the most pumpkin-y)

Black permanent marker

Directions:

Draw a jack-o-lantern face onto the tops of the fruit cups and pack into school lunches or have as a fun surprise for lunches at home!!

That’s it! Pretty easy and a lot of fun : ) Don’t forget to subscribe so you don’t miss next weeks post where I share more fun fall treats!! Happy Fall Ya’ll!

FacebookTwitterEmailPinterestShare

Filed Under: Cooking, DIY Projects Tagged With: easy fall snacks, easy fall treat DIY, fall DIY snacks, fall snacks, food blogger, frankenstein pudding cups, fun fall treats, jack-o-latern fruit cups, kid snacks, leah tackles, Lifestyle Blogger, spider cookie crackers, spider crackers, toddler snacks

How to De-Pot a Candle!! EASY DIY PROJECT!

September 10, 2014 & 4 Comments

Hi there! Happy Wednesday!

I *love* to burn candles, so most evenings when the little loves are asleep Stephan and I like to have candles going! My favorite candles are the Bath and Body Works 3 Wick Candles, but this technique should work for any candle in a glass container.


What You’ll Need:


how-to-depot-a-candle-leahtackles.jpeg


A candle that is done burning (*Tip: I always wait until it won’t burn/stay lit at all…use up all that yummy smelling goodness first!)

A freezer

A sharp knife

Dish Soap

Hot Water

Optional:

Plyers


Step 1:

Once your candle is done burning or will no longer light, let it cool and then place it in the freezer. If you candle comes with a lid, you do *not* need to place the lid in the freezer.  Leave your candle in the freezer for AT LEAST 24 hours. I usually leave my candles in for several days to a week before taking them out.


Step 2:

Take a sharp knife and *carefully* break the wax up. The longer the candle has been in the freezer, the easier it will be to break the wax up and get it out of the candle. The wicks sometimes need to be pulled up with plyers, but if the glue that holds the wicks down has is frozen then they will just come out with the wax. The label stickers will just peel off, but there may be some residue which will wash off in the next step.


howtodepotacandle.jpeg


howtodepotacandleeasily.jpeg


Step 3:

Let the glass get back to room temperature and then place it into a HOT bubble bath in the sink! *Note: Be sure the glass isn’t still freezing or it will crack!!


howtodepotacandle.jpeg


Step 4:

Dry off your new glass container enjoy one of the many uses!!


depotted-candle-diy.jpeg


Some of the Things I Have Used My De-Potted Candles For:


uses-for-depotted-candles-leahtackles.jpeg


Shown:

Candy

Bangle or wrap bracelets

Lipgloss

Q-Tips and cotton rounds

Not Shown:

Confetti/bling decor display (similar to the Easy Apothecary Jar DIY I did)

Homemade treats for gifts

Pretty change jar

Nightstand catch-all

Lantern


The possibilities are really endless with this DIY and it’s sooo easy!! Have fun with it!!
I hope you have a fantastic weekend! Please subscribe if you enjoy my posts and don’t forget to share : ) It honestly does make my day when I see new subscribers!!


FacebookTwitterEmailPinterestShare

Filed Under: DIY Projects Tagged With: a candle, de-potting candles, DIY candle project, diy project, how to de-pot a candle, leah tackles, reusing a candle

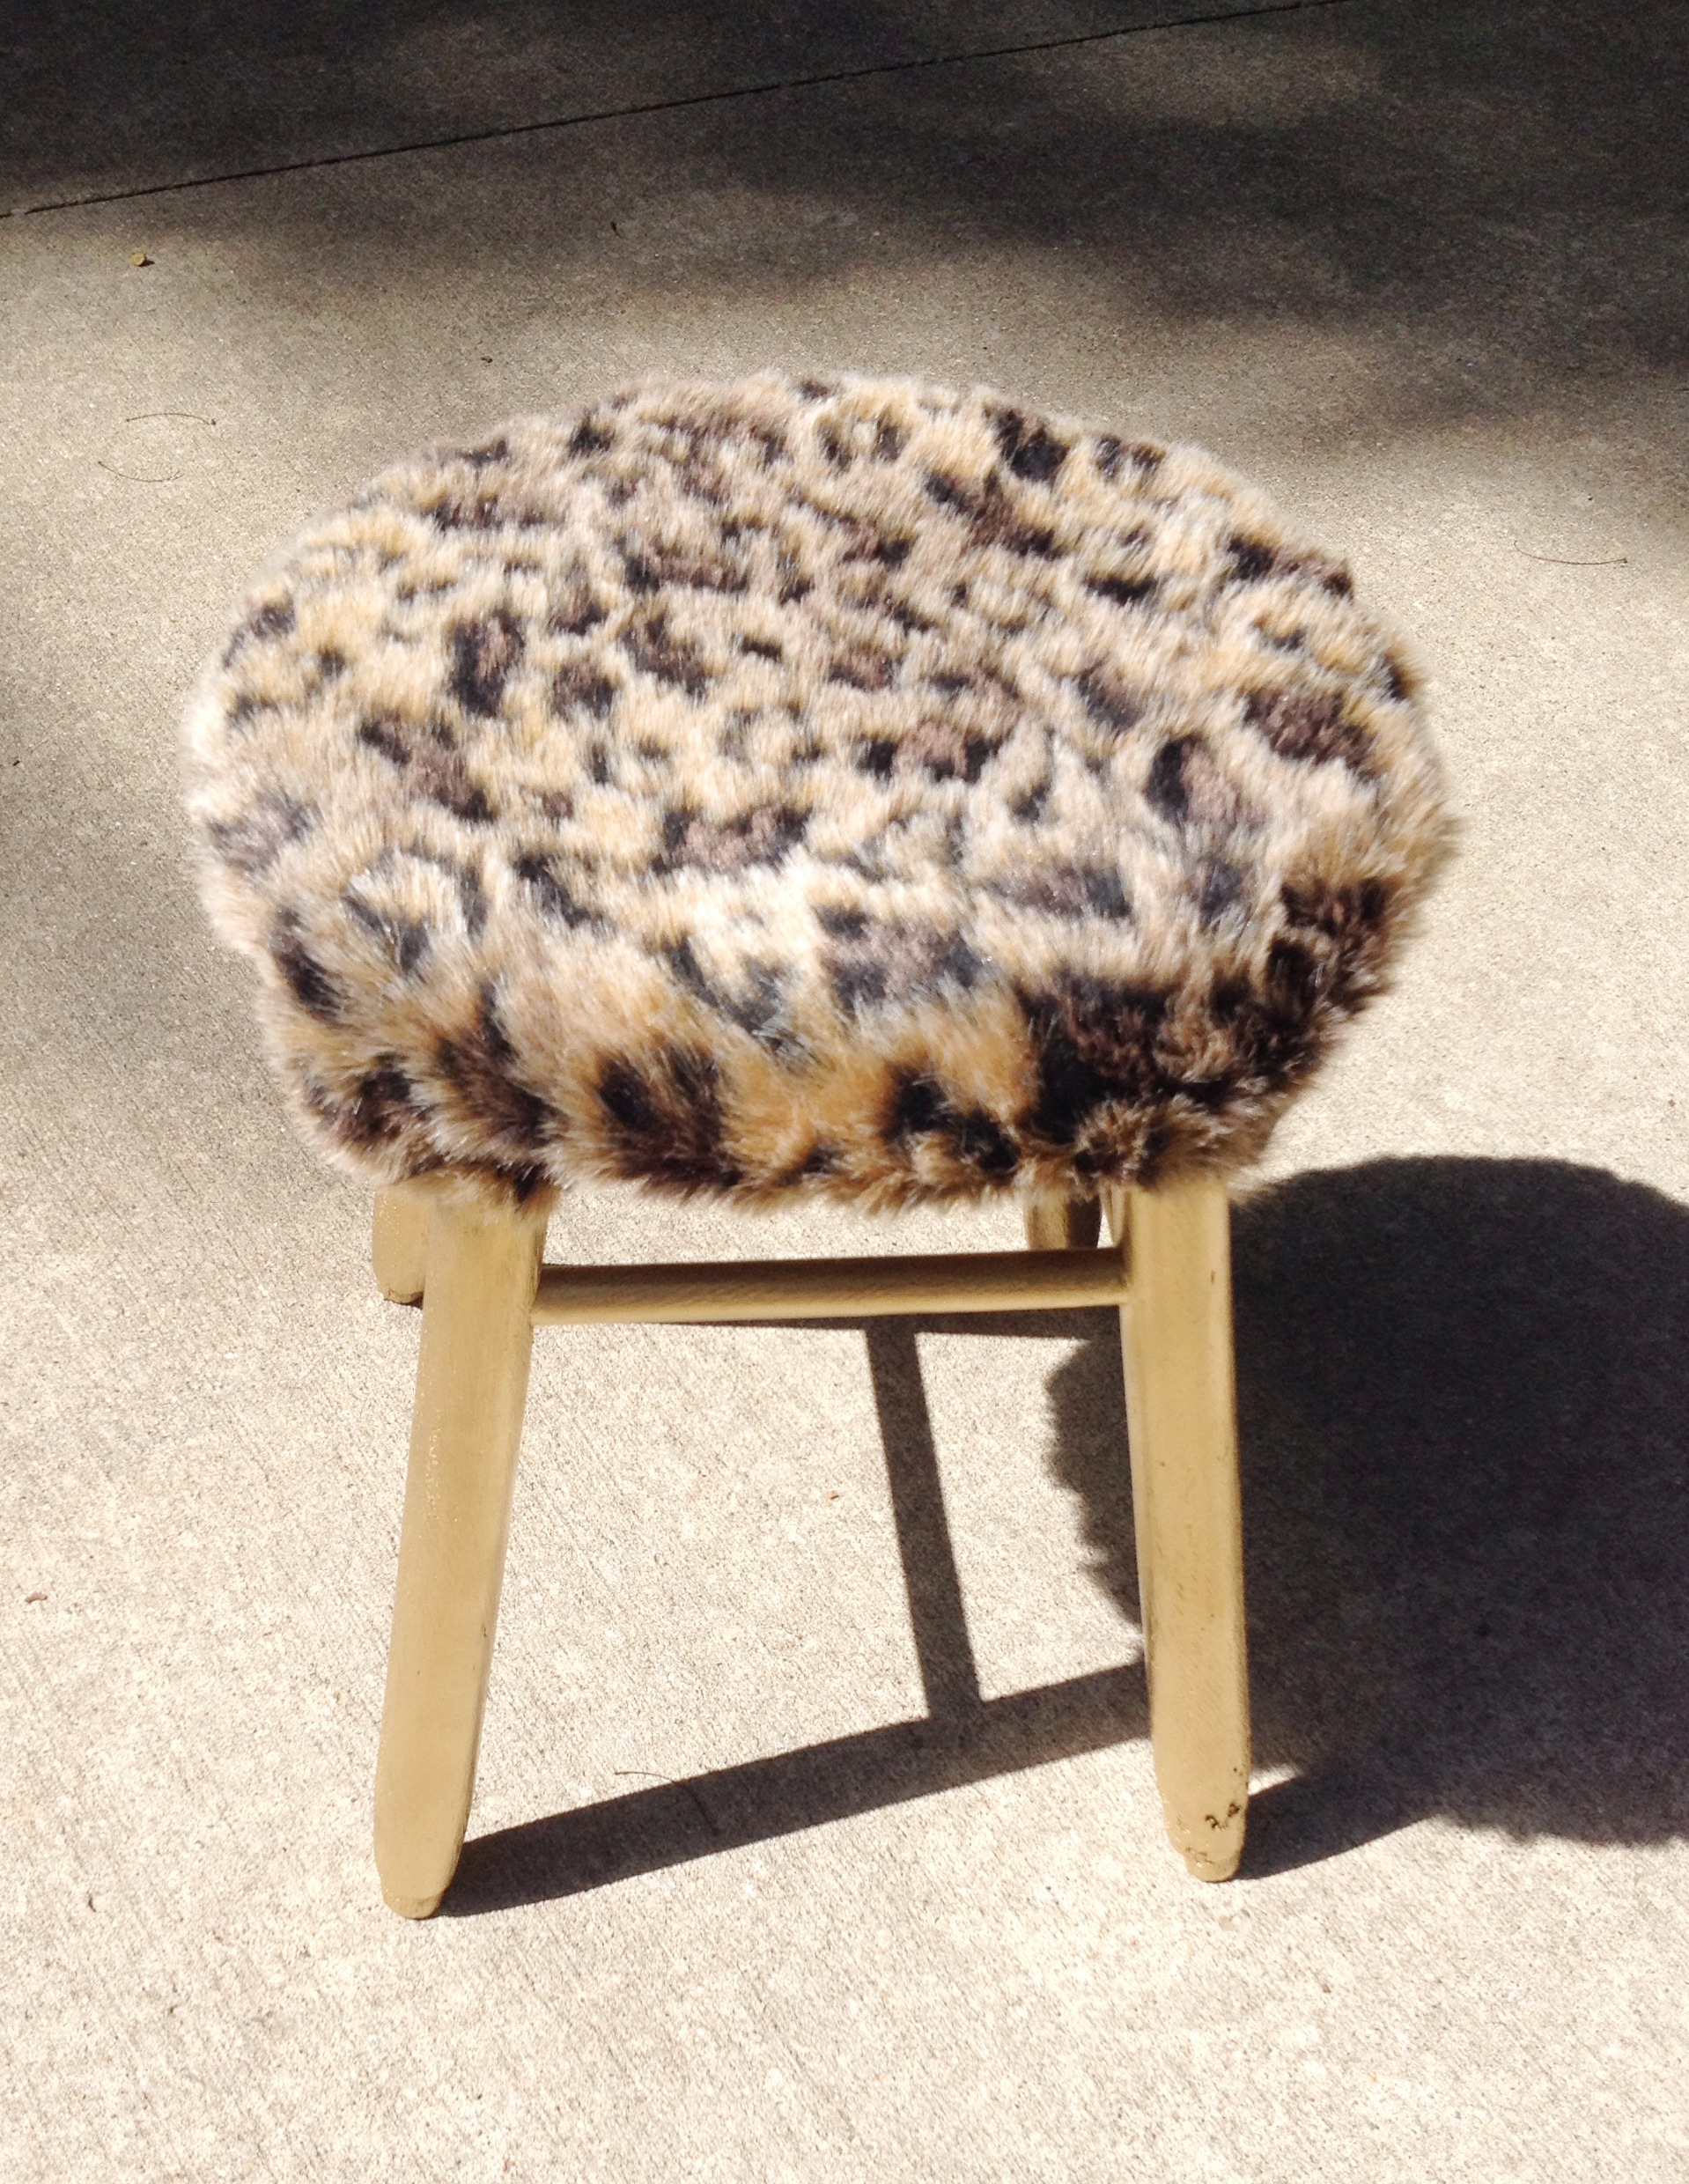
FUR STOOL DIY!!!

August 25, 2014 & Leave a Comment

Hi there! Happy Monday!

I hope that you had a great weekend! I LOVE fur covered stools, but they are really expensive! This fur stool from Pottery Barn Teen is $179 and this fur stool from Anthropologie is $348! So, I found myself an old sturdy barn stool, some spray paint, and some faux fur fabric, and then got to work! I used an old barn stool, but any wooden stool should work! You can find stools for less than $20 on ebay, at garage sales, or maybe even at Target.


diyfurstool.jpeg


FAUX FUR STOOL:

What You’ll Need:

Wooden Stool (padded top is okay, just the bottom of the seat must be wood)

Spray Paint

Faux Fur Fabric

Staple Gun

Optional:

Sandpaper


Step 1:

Clean and sand your stool. Sandpaper grit doesn’t matter much, just don’t get one so heavy that it will gouge out the wood on the stool.


fur-stool-diy-project.jpeg


Step 2:

Spray paint the legs of the stool. Don’t worry about getting it on the seat, it’ll get covered in fabric : ) Let dry.


Step 3:

Cut fabric to the size you’ll need. *Tip: I didn’t measure exactly, I just tossed it over the seat of the stool and made sure I  had enough to fold under to the bottom of the seat.


diyfauxfurstool.jpeg


Step 4:

Staple the fabric to the bottom of the seat and done!!


fur-stool-diy.jpeg

faux-fur-stool-diy-leahtackles.jpeg


I hope you enjoyed this post! If you did, please be sure to subscribe if you haven’t already, and share it on your Pinterest!


FacebookTwitterEmailPinterestShare

Filed Under: DIY Projects Tagged With: DIY faux fur stool, diy project, DIY stool, faux fur stool, foot stool, fur stool, leah tackles, Lifestyle Blogger, vanity stool

July Favorites!

August 1, 2014 & Leave a Comment

Hi there! Happy Friday!!!!!

After grabbing my favorite items for this post I was going to break it up into sections of beauty items vs. lifestyle items, take invidual photos, do swatches…the whole nine yards! But then I decided it is FRIDAY and who wants to read all that?! So, if you have any questions on any of the products mentioned *please* feel free to comment and I will absolutely get back to you! I may go back to doing favorites more like this or maybe I’ll stick to something more short and sweet like this. I also want to start mention any product flops…it could be helpful!  : ) You can definitely let me know your opinions as well!


Now, let’s jump into it!


JULY FAVORITES:


july-favorites.jpeg


1) “She…” by Kobi Yamada

This book is so special and would be a beautiful gift for any girl. Each page has an inspiring message and the books deisgn is stunning.


2) Hair Donut

Okay, so at first these reminded me of Bumpits (who remembers those from a few years back? Yes, I totally had one! NO worries!) and I was pretty unsure but late last year I picked  up a hair donut….I love it! It makes doing the perfect sock bun so easy, and yes I realize you can do it with a sock, but this just works so well for me! This isn’t a new item to me, but it’s a rediscovered favorite, and I’ve been loving it for second day hair. You can get them at Claire’s or Ulta, but I got mine off Amazon.


3) Sparkly Gold Coaster

I just made these glitter coasters for a DIY and I am in love! They are so cute and functional. They make everyday special and I love things like that.


4) Scotch Expressions Washi Tape

I love washi tape and having them so accessable now from companies like Scotch is so conveinient! I like these for hanging up things on my wall, sealing envelopes, and countless craft projects.


5) Zoya Nail Polish in Rooney

I mentioned this in my post What I Wore to the Michigan Girls Blogging and Social Media Meet Up  and it has been on my nails a large majority of the summer. It’s a beautiful hot pink that leans on the blue toned side and it goes on perfectly every time.


6) Essie Nail Polish in Urban Jungle

This is a gorgeous nude that is unlike anything I own! It isn’t white but also isn’t nude…it’s the perfect off white, neutral color! It is described as “alabaster orchid”. Out of all the nail polishes I have, Essie is always my biggest crush, and this one doesn’t disappoint.


7) Too Faced Natural Eyes

These 9 neutral eye shadows are super pigmented and blend like a dream! I adore this little kit!!


8) Arboone Lip Saver Broad Spectrum SPF 30 Sunscreen

This product I’ve only had for the better part of a week, so considering it a July favorite is a *bit* of a strech…BUT it’s wonderful! I’ve used it every day since I’ve had it and like putting it on before my lip color. It doesn’t have a yucky sunscreen taste and it is a very shiny chapstick that could truly be worn alone for a nautral summer look.


9) Revlon Super Lustrous Lip Gloss in 235 Pink Pop

Super pigmented, long wearing, not too sticky but sticky enough to last more than 10 minutes….I love this lip gloss! The packaging is chic and looks very high end to me which is fabulous for the drugstore price tag. The color Pink Pop is so fun for summer and you can wear this alone and still achive a very hot pink lip.


10) Anthropologie Marbled Sunglasses

I really wanted a pair of round sunglasses and when I saw these with the rose gold toned glitter and tortoise?! I was sold!


11) Lucky Girl Hair Ties

These are my favorite hair ties right now and I love that they cute on my wrists as well. I don’t tend to wear my hair up, but on days when I rock an Elsa braid (as my 3 year old calls it!), I use these : )


12) Anastasia Beverly Hills Contour Kit

This is SO amazing! I have been using this nearly every day lately! The contour colors blend out flawlessly and they never look muddy or organge even on my super fair complextion.


That’s it : ) Now, I want to know! What have YOU (yes, YOU!!) been loving lately? I would love to hear your thoughts, product suggestions, and opinions! So let me know by commenting…it’s easy, just click the link by the title of this post. Also, what are your plans for the weekend? I am *super* excited because the hubster and I are going to a Manchester United soccer game…..eeeeeep!!!!  Thank you for reading and please subscribe if you enjoy my posts : ) Have a fabulous weekend loves!!


FacebookTwitterEmailPinterestShare

Filed Under: Beauty, DIY Projects, Fashion Tagged With: anastasia contour kit, Anthropologie, arboone, beauty favorites, DIY glitter coasters, essie, glitter coasters, hair donut, july favorites, leah tackles, Lifestyle Blogger, lifestyle favorites, lucky girl hair ties, revlon, she book, too faced, washi tape, zoya

GLITTER COASTER DIY

July 28, 2014 & 3 Comments

Hi there! Happy Monday!

Recently I was walking the aisles of Hobby Lobby looking for some DIY inspiration because I hadn’t done a fun project in several weeks and I ran across Krylon Glitter Blast Glitter Spray….ohhh my goodness! I quickly tossed it in the cart because I knew I wanted to use it for something! I stumbled upon these little pre-cut wooden circles. Wooden circles + glitter blast = perfect coasters!! And it couldn’t be easier!!


GLITTER COASTERS:


What You’ll Need:


Krylon Glitter Blast Glitter Spray in Golden Glow

Wooden Circles


krylon-glitter-blast.jpeg


Step 1:

Spray the glitter blast on in a fairly heavy coat.


Step 2:

Let dry between each coat (it doesn’t take long at all with this glitter spray!)


Step 3:

Spray one or two more heavy coats.


glitter-coaster-diy.jpeg


Step 4:

Enjoy your glitterific new coasters!


glitter-coaster-diy.jpeg


Thank you for reading! Don’t forget to share this on Pinterest if you’ve enjoyed! I hope you have a great week  : )


FacebookTwitterEmailPinterestShare

Filed Under: DIY Projects Tagged With: DIY glitter coasters, glitter blast, glitter coasters, gold glitter coasters, krylon glitter blast, leah tackles

How To Organize and Store 1,500 DVDS in a Small Space!!!

July 14, 2014 & 4 Comments

Hi There!! Happy Monday!

When my husband and I first moved in together we were fresh out of college living in a small apartment. We stored our now huge combined collection of DVDs on a floor to ceiling bookcase and that worked fine….for awhile! Fast-forward to living in our first house with two toddlers…the DVDs on a bookcase wasn’t going to cut it! For one, I don’t like the way it looks in a room that is a central focus in our home. But even more importantly, DVDs left out where the kiddos could reach isn’t an option! At first we just had all of our DVDs in a giant bin in our basement, but we ended up never watching any of them or when we wanted to we had to dig through all of the unorganized DVDs. Finally, I decided to tackle the DVD project. I knew that we had close to 1,500 DVDs ( I know, I know….craaazy!) to store and that I wanted it to be organized….so today I share what I did to organize a LOT of DVDs.


HOW TO ORGANIZE YOUR DVDS:

1) I bought 3 cases off of eBay that were very similar to this although I can not find the exact case anymore. I do know that sometimes eBay stores/sellers will give you the option to “make an offer” and TOTALLY take advantage of that!! Obviously you don’t want to make a super low-ball offer, but especially if you’re buying 2 or 3 cases, it is worth seeing if you can get a little bit knocked off.


dvd-storage-idea.jpeg

dvd-storage.jpeg


2) I seperated all of our DVDs by genre (you can do as many or as few categories as you want) and then alphabetized the DVDs. Alphabetizing them is optional, but I love the way it turned out and it didn’t take too much extra time.

3) I put the DVDs into the cases by genre and in alphabetical order.

4) I typed up all of the movies, printed out the sheets, and put them in clear page protectors to have at the front of the cases for quick reference. This step is totally optional!! I do realize that as we buy more DVDs there won’t be spaces to put them into and that they won’t be on the list, but for now my plan is to just add them (overlap the DVDs where needed) and write the title in pen wherever it would alphabetically be on the list. I don’t think it will be too big of a problem since we hardly ever buy DVDs anymore. We are BIG into Netflix and Hulu Plus, so we rarely add to our hardcopy collection. If you have any better ideas for what to do when I add more DVDs, please let me know! I would love ideas!! : )


dvd-storage.jpeg


5) Enjoy your perfectly organized DVDs!! I know this project make seem super time consuming, but I did it all over a couple of evenings while watching TV with my husband, Stephan. I *love* the way that this turned out and it is so nice to be able to easily find a movie or show on DVD to watch!!


Thank you so much for taking the time to read this! How do you store your DVDs? I would love to hear what other people do! I hope that you have a fabulous start to your week : )

DON’T FORGET TO ENTER MY GIVEAWAY FOR A BEAUTIFUL BRACELET FROM ELL AND EMM!! A $42 VALUE!! 

FacebookTwitterEmailPinterestShare

Filed Under: Decor, DIY Projects Tagged With: DVD organization, home organization, how to organize DVDS, leah tackles

EASY DIY SUMMER WREATH THAT *ANYONE* CAN DO!!!

June 4, 2014 & 4 Comments

Hi there! Happy Wednesday!

A lot of people tell me that I’m “crafty” and I do enjoy lots of different types of crafting, but I didn’t really get into it until after graduating from college. I started because I loved looking at other peoples projects, and figured I could give it a shot too. I know that everybody has different interests and talents, but I think that the main thing for a lot of crafts is just DOING IT! So, today I want to show you a DIY for a summer wreath that I *promise* anyone can accomplish! And what makes it even better is that it only uses a few easy to find supplies, and only takes 30 or so minutes. If you enjoy this, please pin it to your Pinterest account by hovering over any of the pictures and clicking the pink “pin” button that will appear : )


Ready?! Let’s get started!


SUMMER WREATH DIY:


What you’ll need:


wreath-supplies.jpeg


Styrofoam wreath form (NOTE: Avaliable at craft stores or the craft sections of big box stores)

Wreath hanger

Fake flowers (TIP: I got mine at a dollar store!)

Ribbon

Wire cutters

Glue gun or other strong glue of choice


Step 1:

Use the wire cutters to cut the flowers so that there is only 1/2 inch to 1 inch of stem left.


flowers.jpeg


Step 2:

Stick the flowers into the wreath to cover the styrofoam.

Step 3:

Wrap the ribbon around the wreath hanger and glue down the ends.


summer-wreath-diy.jpeg


Step 4:

Hang up your gorgeous wreath for everyone to admire : )


summer-wreath.jpeg


That. Is. It!

I hope that you enjoyed this easy DIY project! If flowers aren’t your thing, I also saw an ADORABLE wreath using cocktail umbreallas! Don’t forget to comment if you have any questions or comments! And as always, please subscribe! Thank you and have a wonderful rest of your week!!


FacebookTwitterEmailPinterestShare

Filed Under: DIY Projects Tagged With: diy project, easy summer wreath diy, leah tackles, leahtackles, summer wreath, summer wreath DIY, wreath

« Previous Page
Next Page »

SUBSCRIBE

Leave your email to subscribe!

SEARCH

SPONSORS

ARCHIVES

GRAB MY BUTTON


copy & paste code

site design by The Kinch Life Design & development by Olive & Ivy Design