Leah Tackles

  • Home
  • About
  • Policy
  • Beauty
  • Fashion
  • Cooking
  • Exercise
  • DIY Projects
  • Decor
  • Book Club
  • Family

NAIL POLISH TUTORIAL-HOW TO AVOID BRUSH STROKES WITH FROST FORMULA POLISH

April 18, 2014 & 2 Comments

Hi There! Happy Friday!!! (Friday’s always deserve the most exclamation points!)

A few weeks ago I shared my Wet n’ Wild Spring 2014 Limited Edition Collections “And the Style Award Goes To…” post and mentioned that there is a technique I saw awhile ago to avoid the brush strokes that often happen when using a frost formula nail polish. I had a reader comment that they would love to see the technique, so today I am going to share a quick tutorial post with you on how you to do it by simply using a makeup sponge. I love hearing from you, so if YOU  have anything you would like to see on here, comment (click the link by the title of this post) and let me know!


What you’ll need:


A small piece of a makeup sponge or a sponge eye shadow applicator (my preference is the eye shadow applicator)

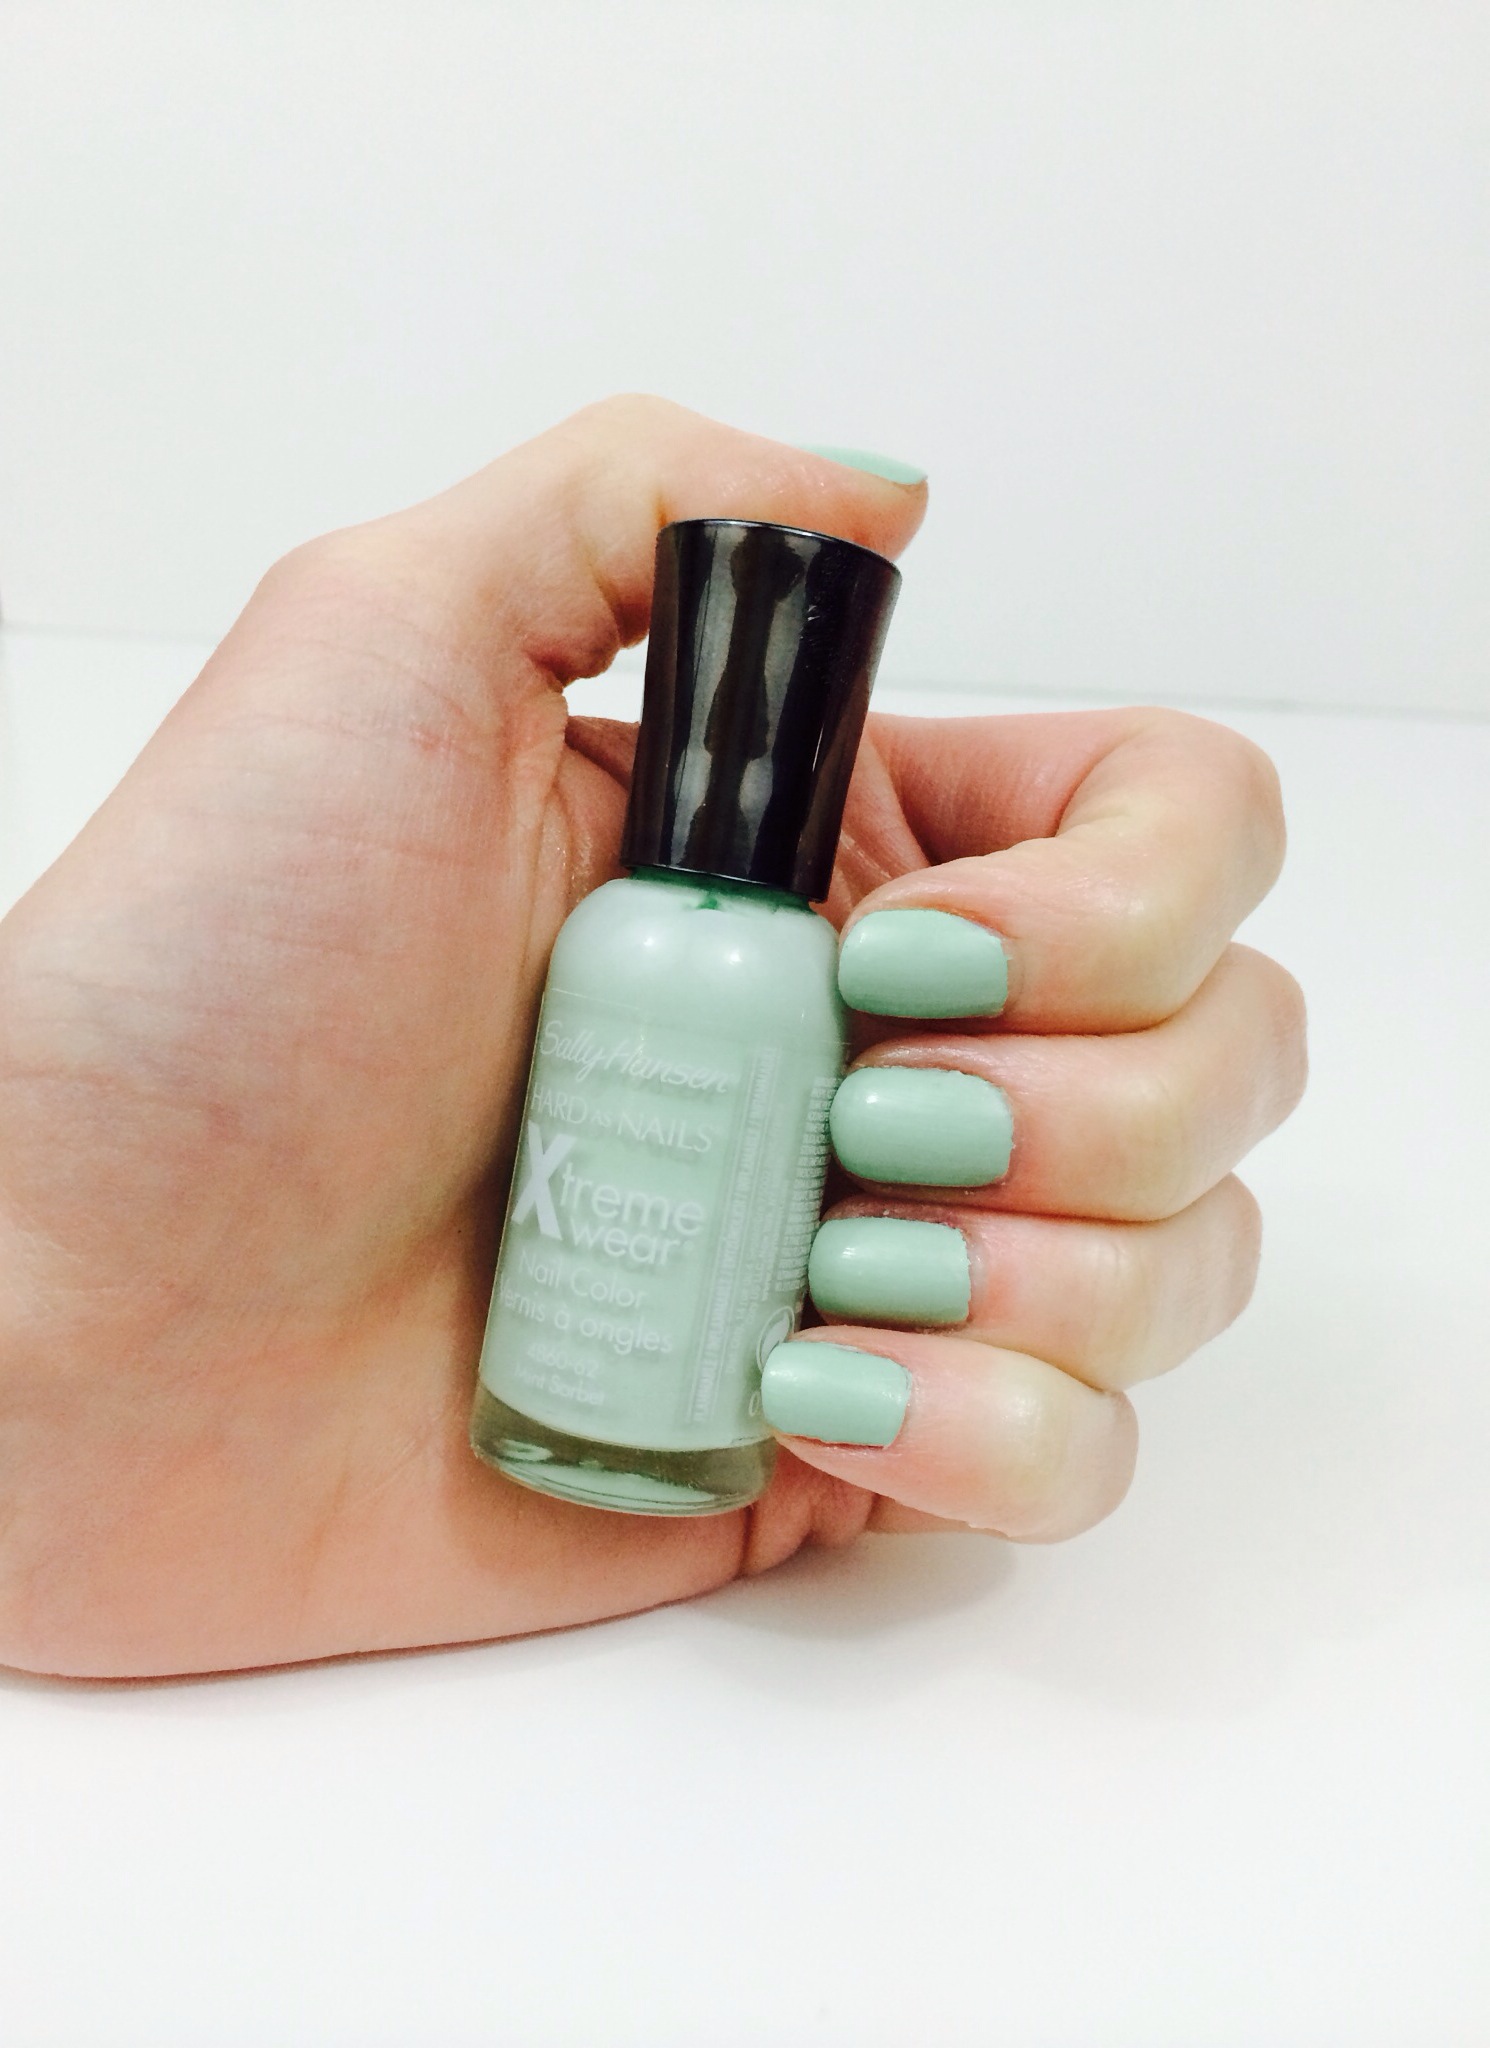
A frost nail polish (a nail polish with a very fine, smooth shimmer)

A base coat nail polish and a top coat nail polish (optional, but highly recommended)


Products I used:


Revlon Colorstay base coat (005)

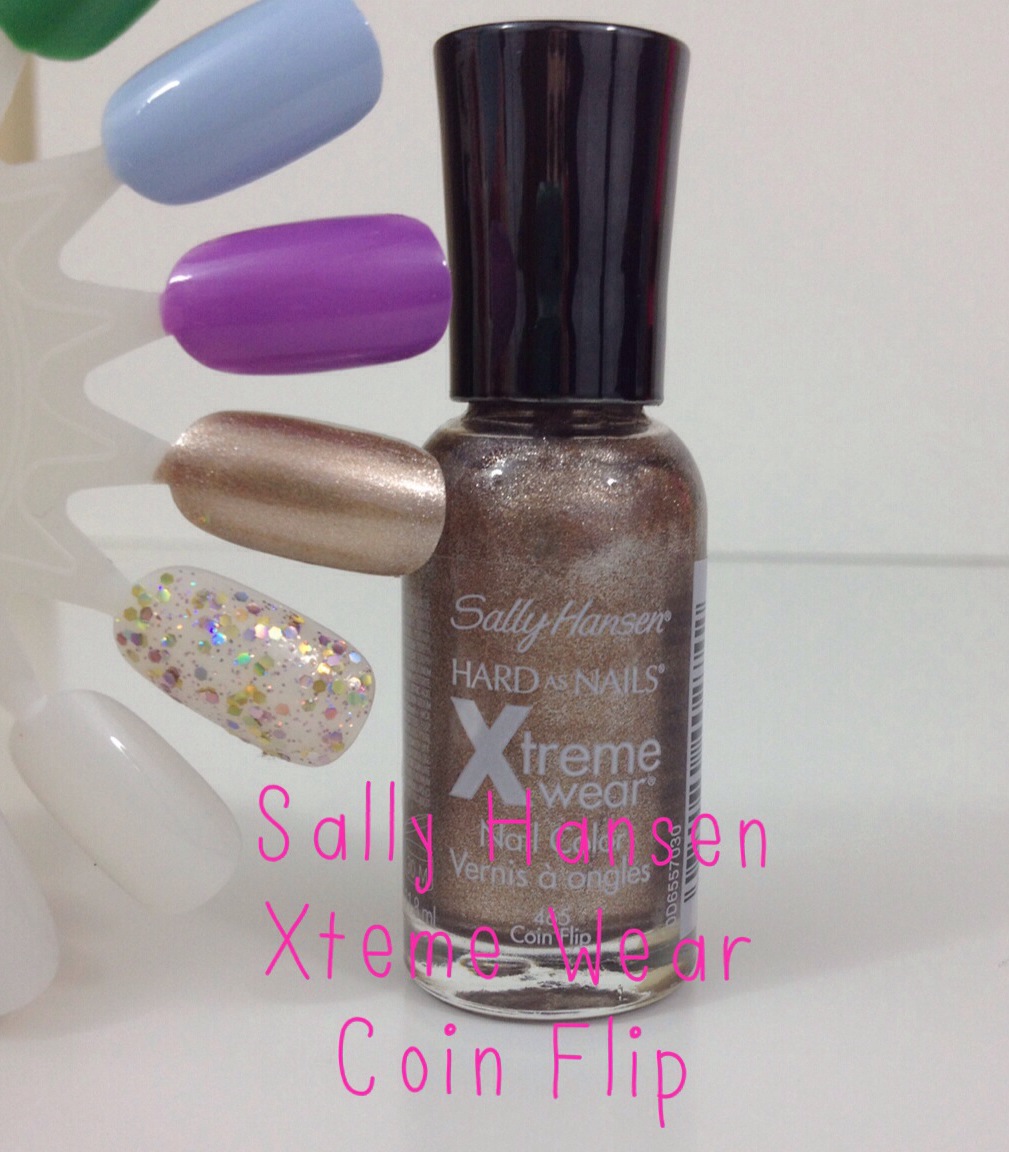
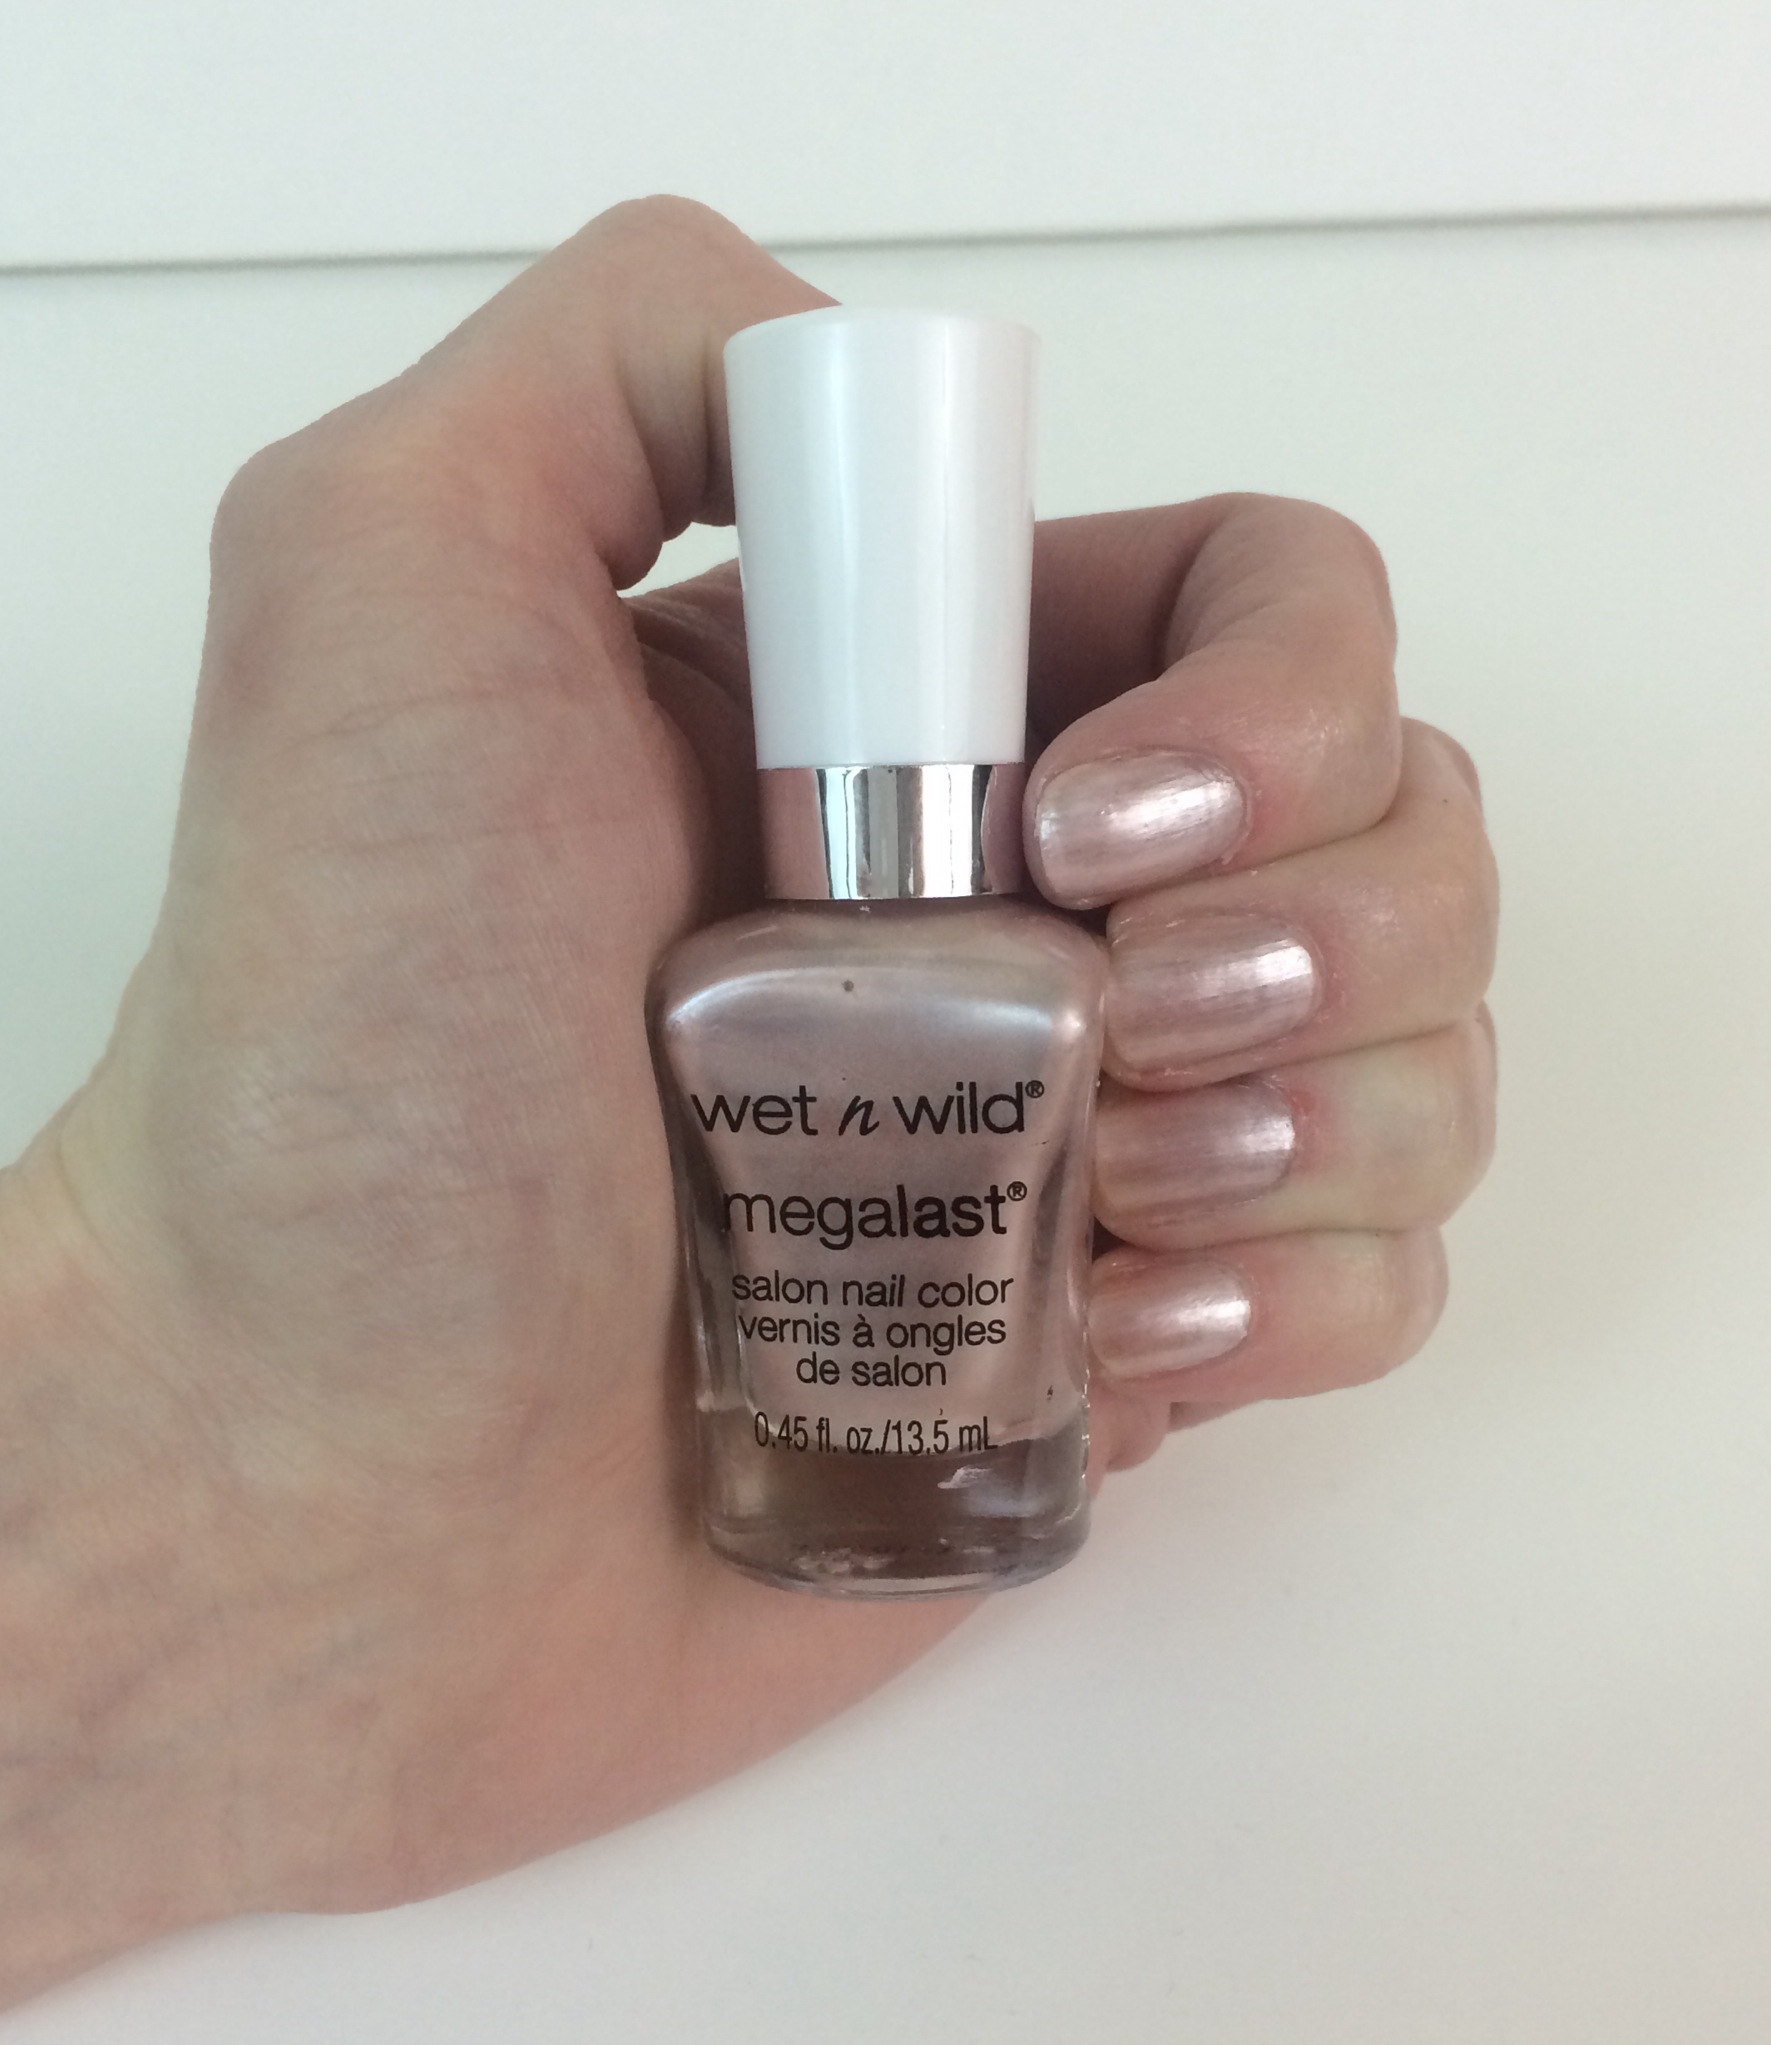
Wet n’ Wild Megalast in Sophisticated Lady (34359)

Out The Door top coat


Step 1:


top-coat-nail-polish.jpeg


Apply your base coat


Step 2:


nail-polish-tutorial.jpeg


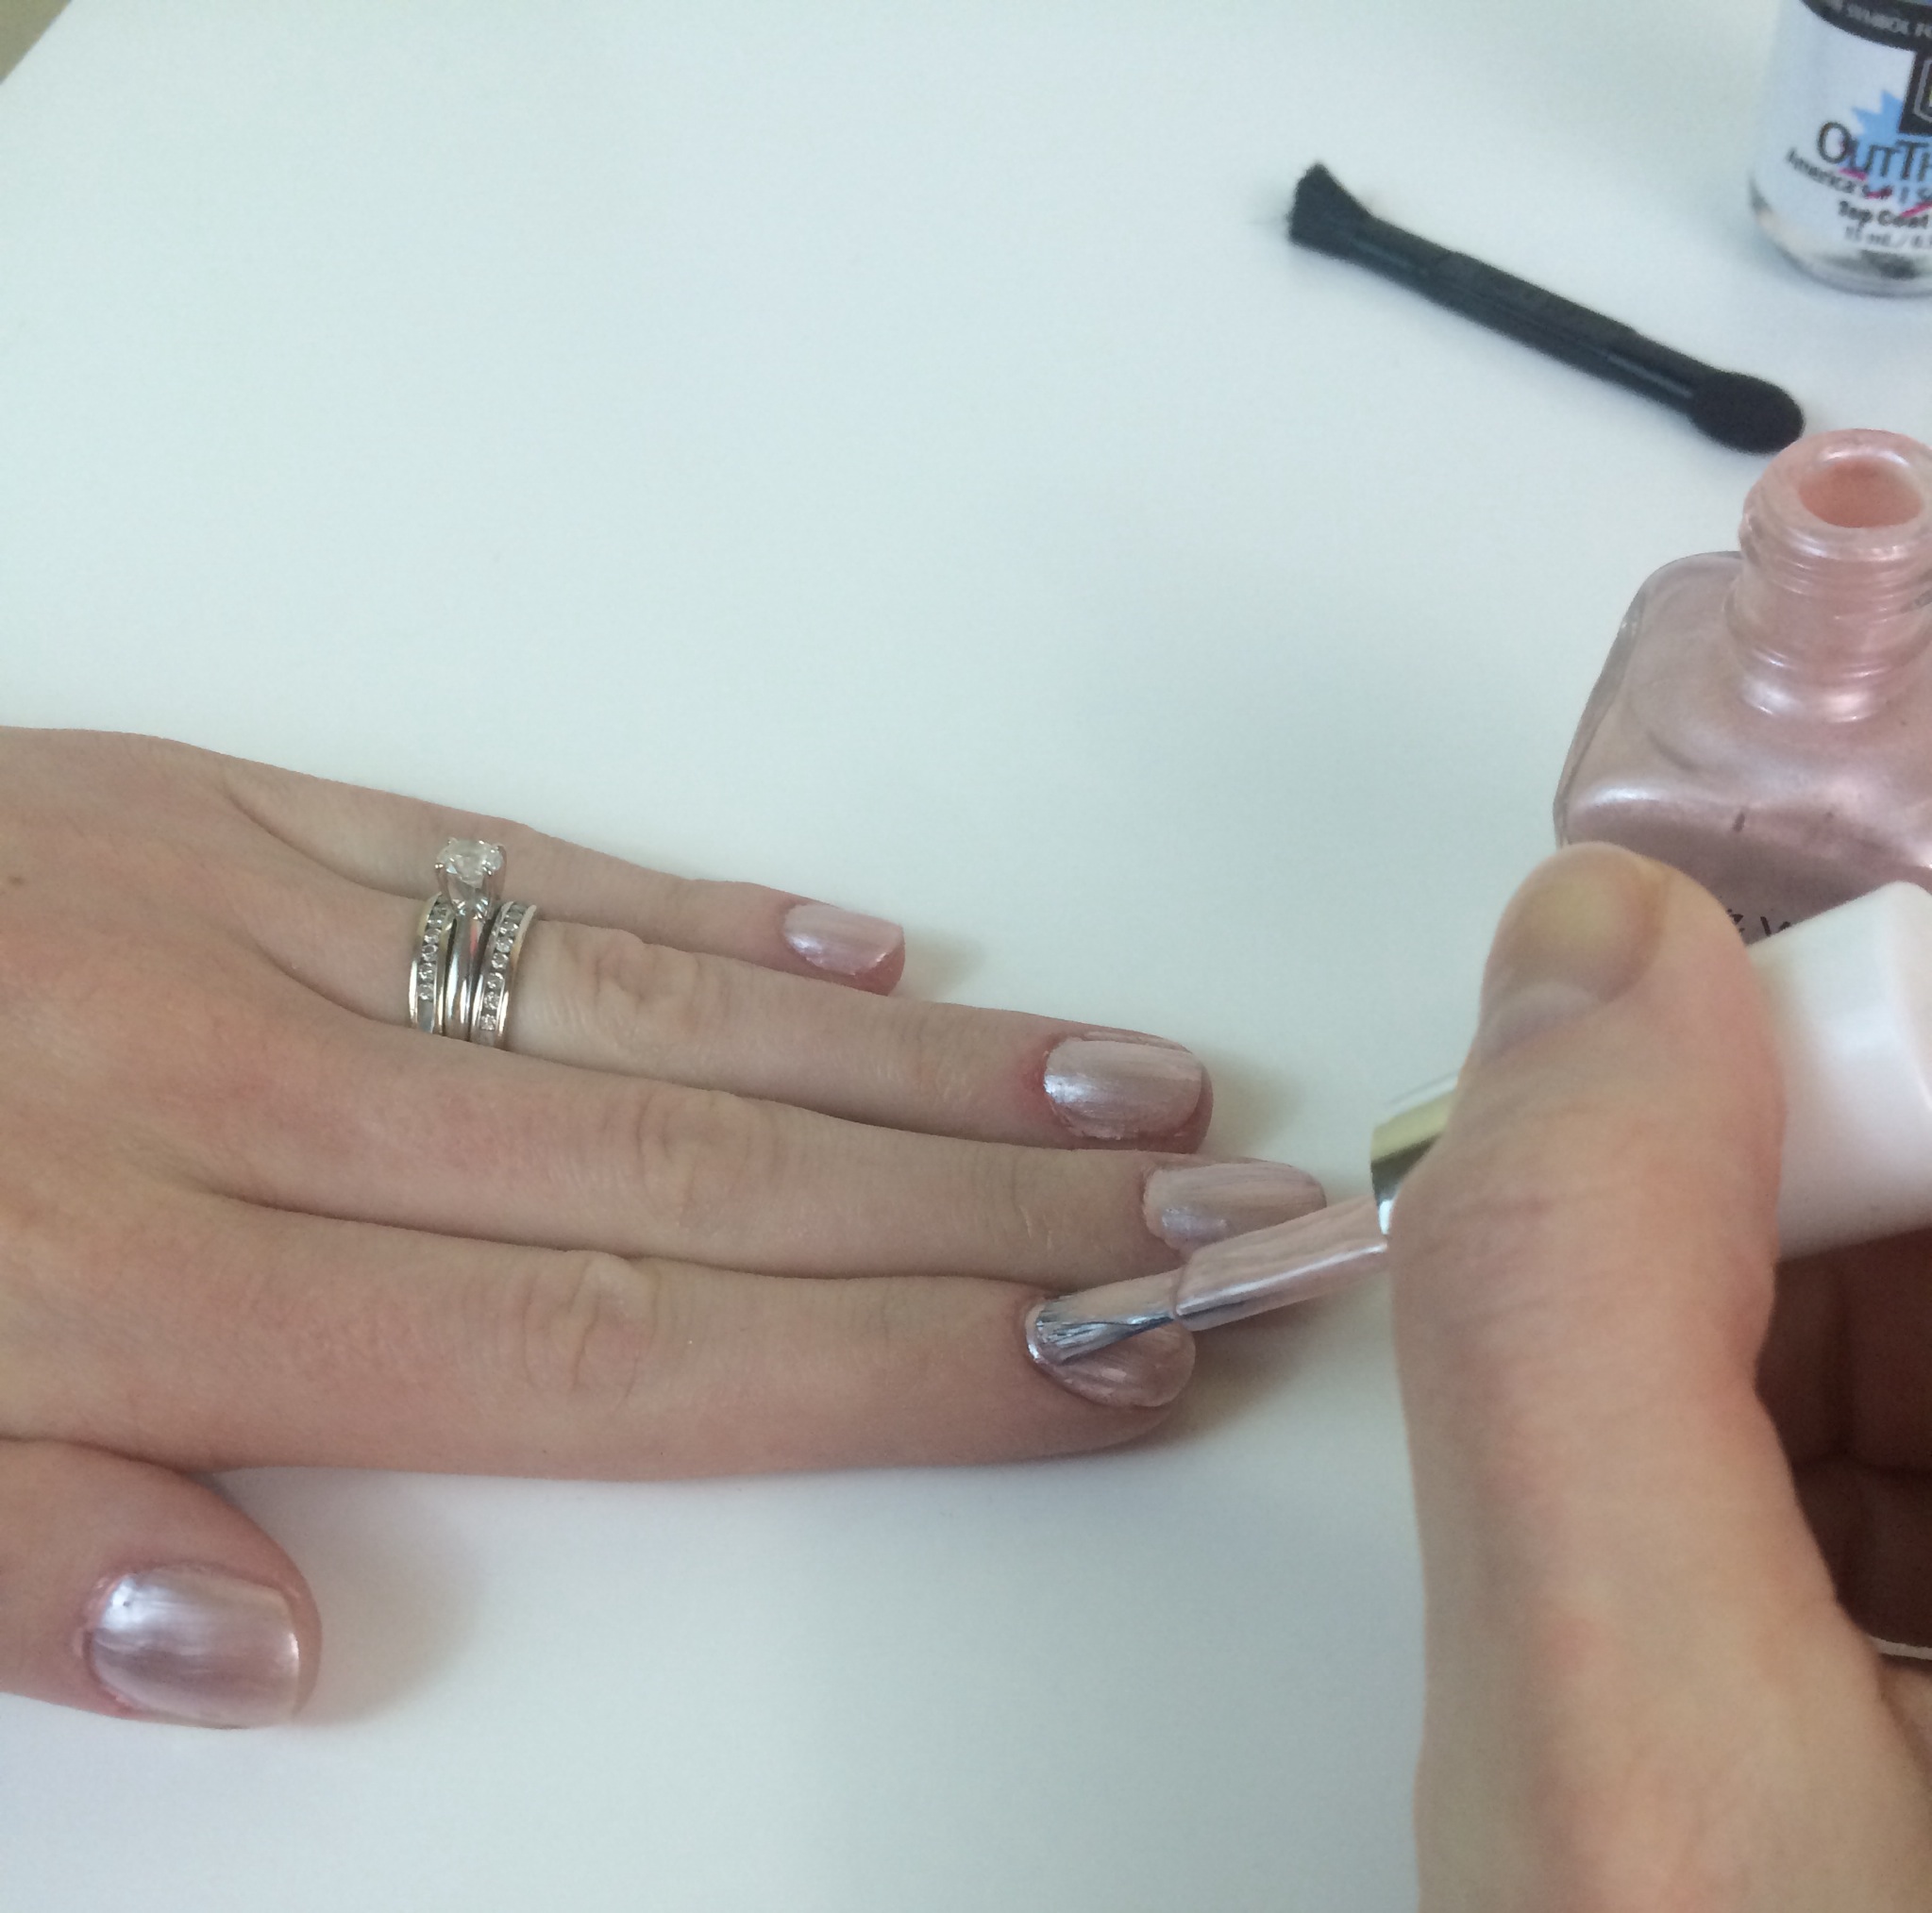
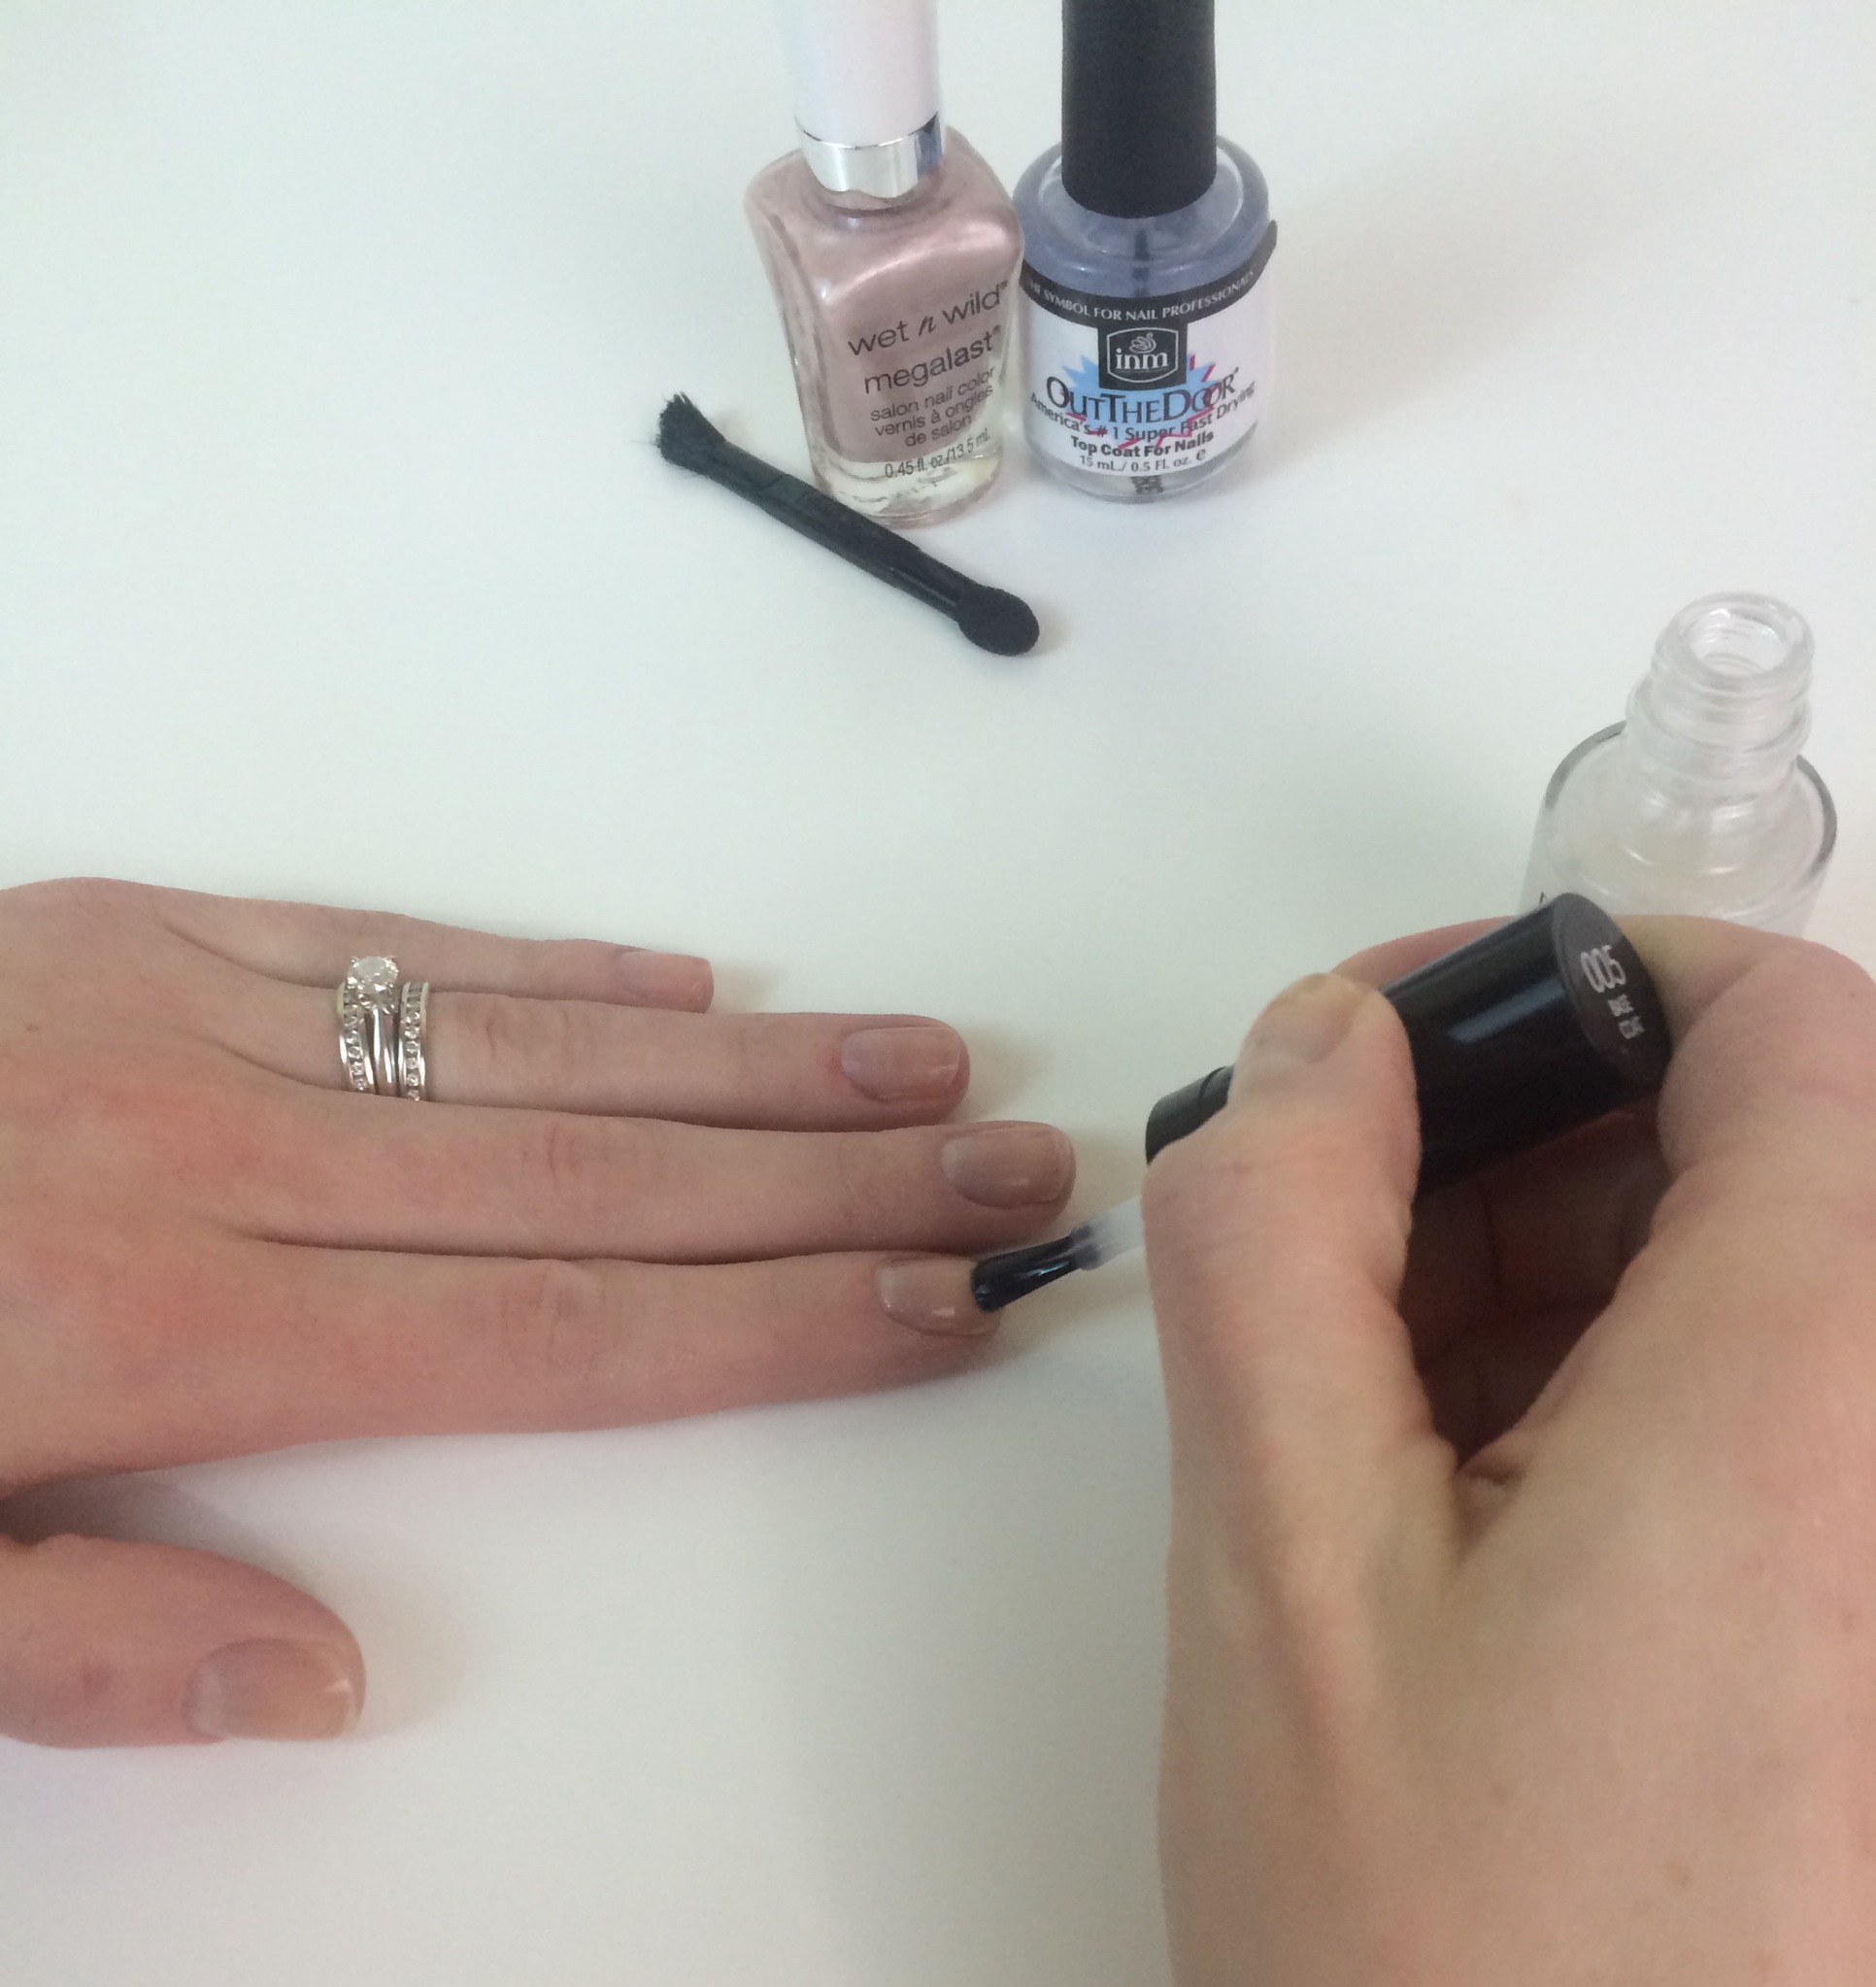
Apply 1 or 2 coats of your frost nail polish with the brush your nail polish comes with.


Step 3:


photo 4 (10)


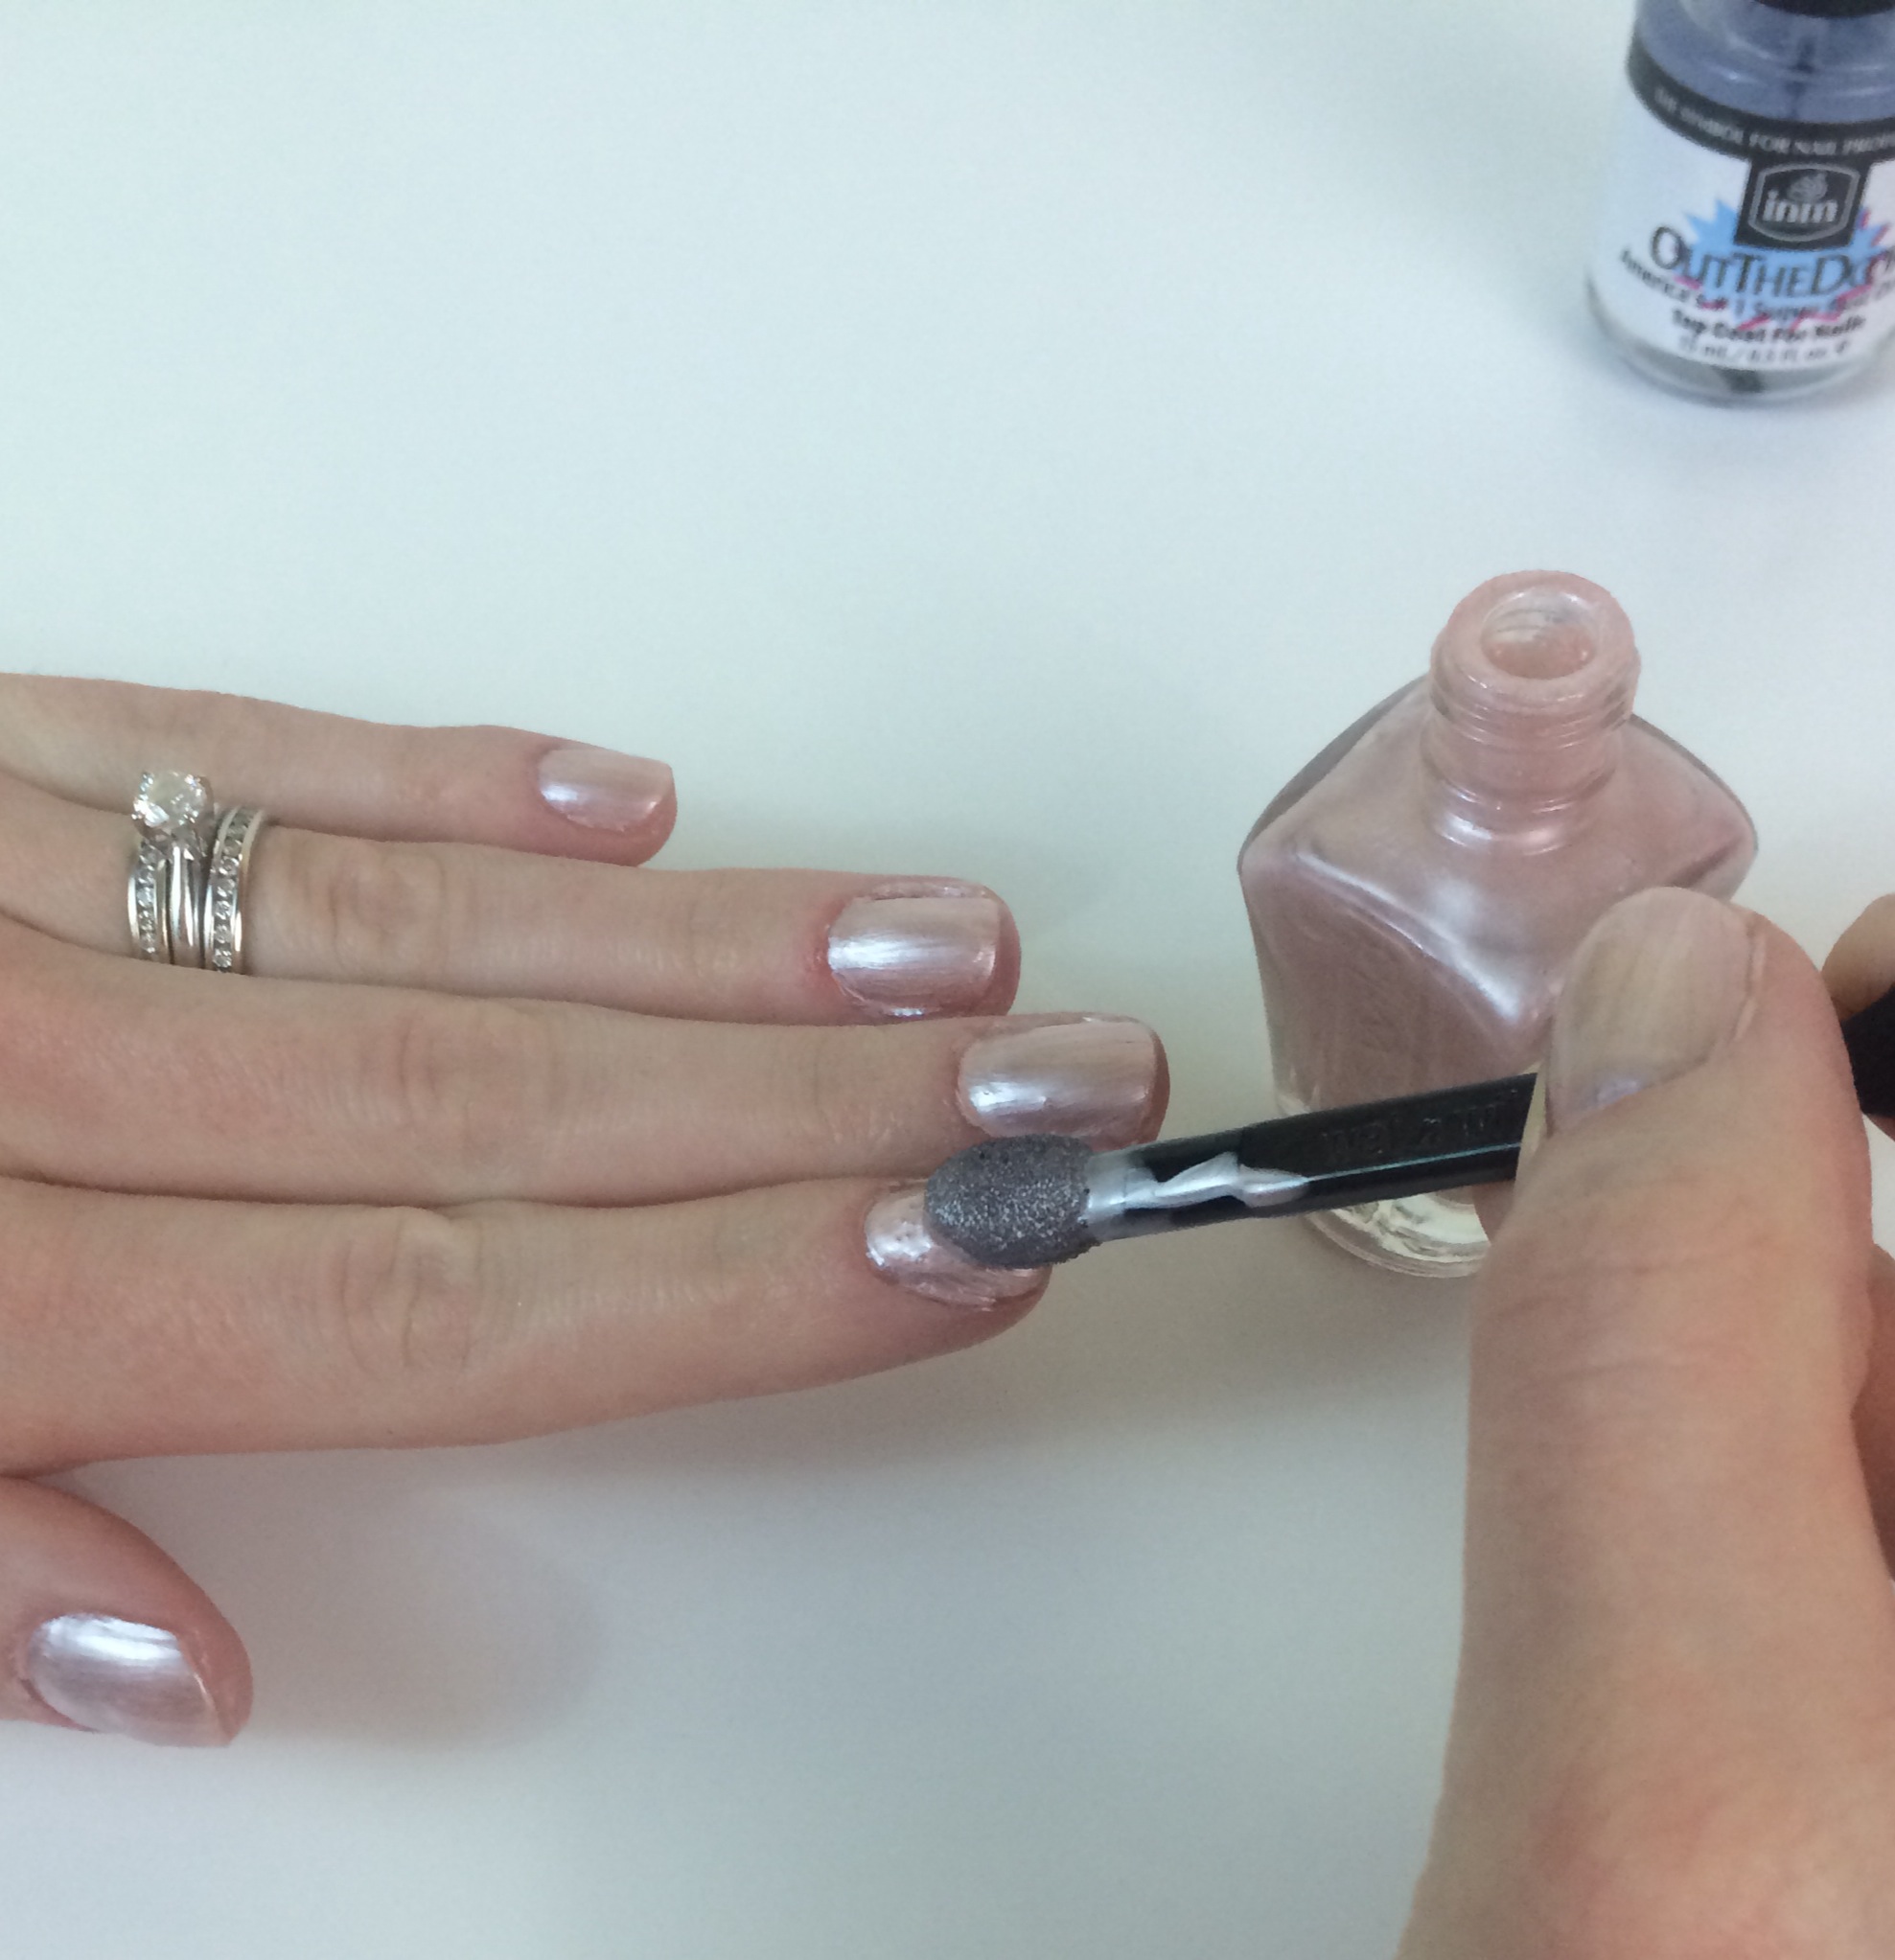
Carefully dip your sponge tip eye shadow applicator into the nail polish or if using a makeup sponge pour a small amount of polish onto a paper plate or something else you can toss when you’re done. Then brush the sponge over your nails in one even motion. If you go over the nail with the sponge too much it can cause bumps which isn’t the look you want (I don’t think!). Try to sure that the sponge isn’t too soaked in the polish, getting it ever so slightly wet before dipping it into the polish can help with this.


Step 4:


nail-polish-wet-n-wild.jpeg


Apply your top coat and allow the polish to dry!


my-nails.jpeg


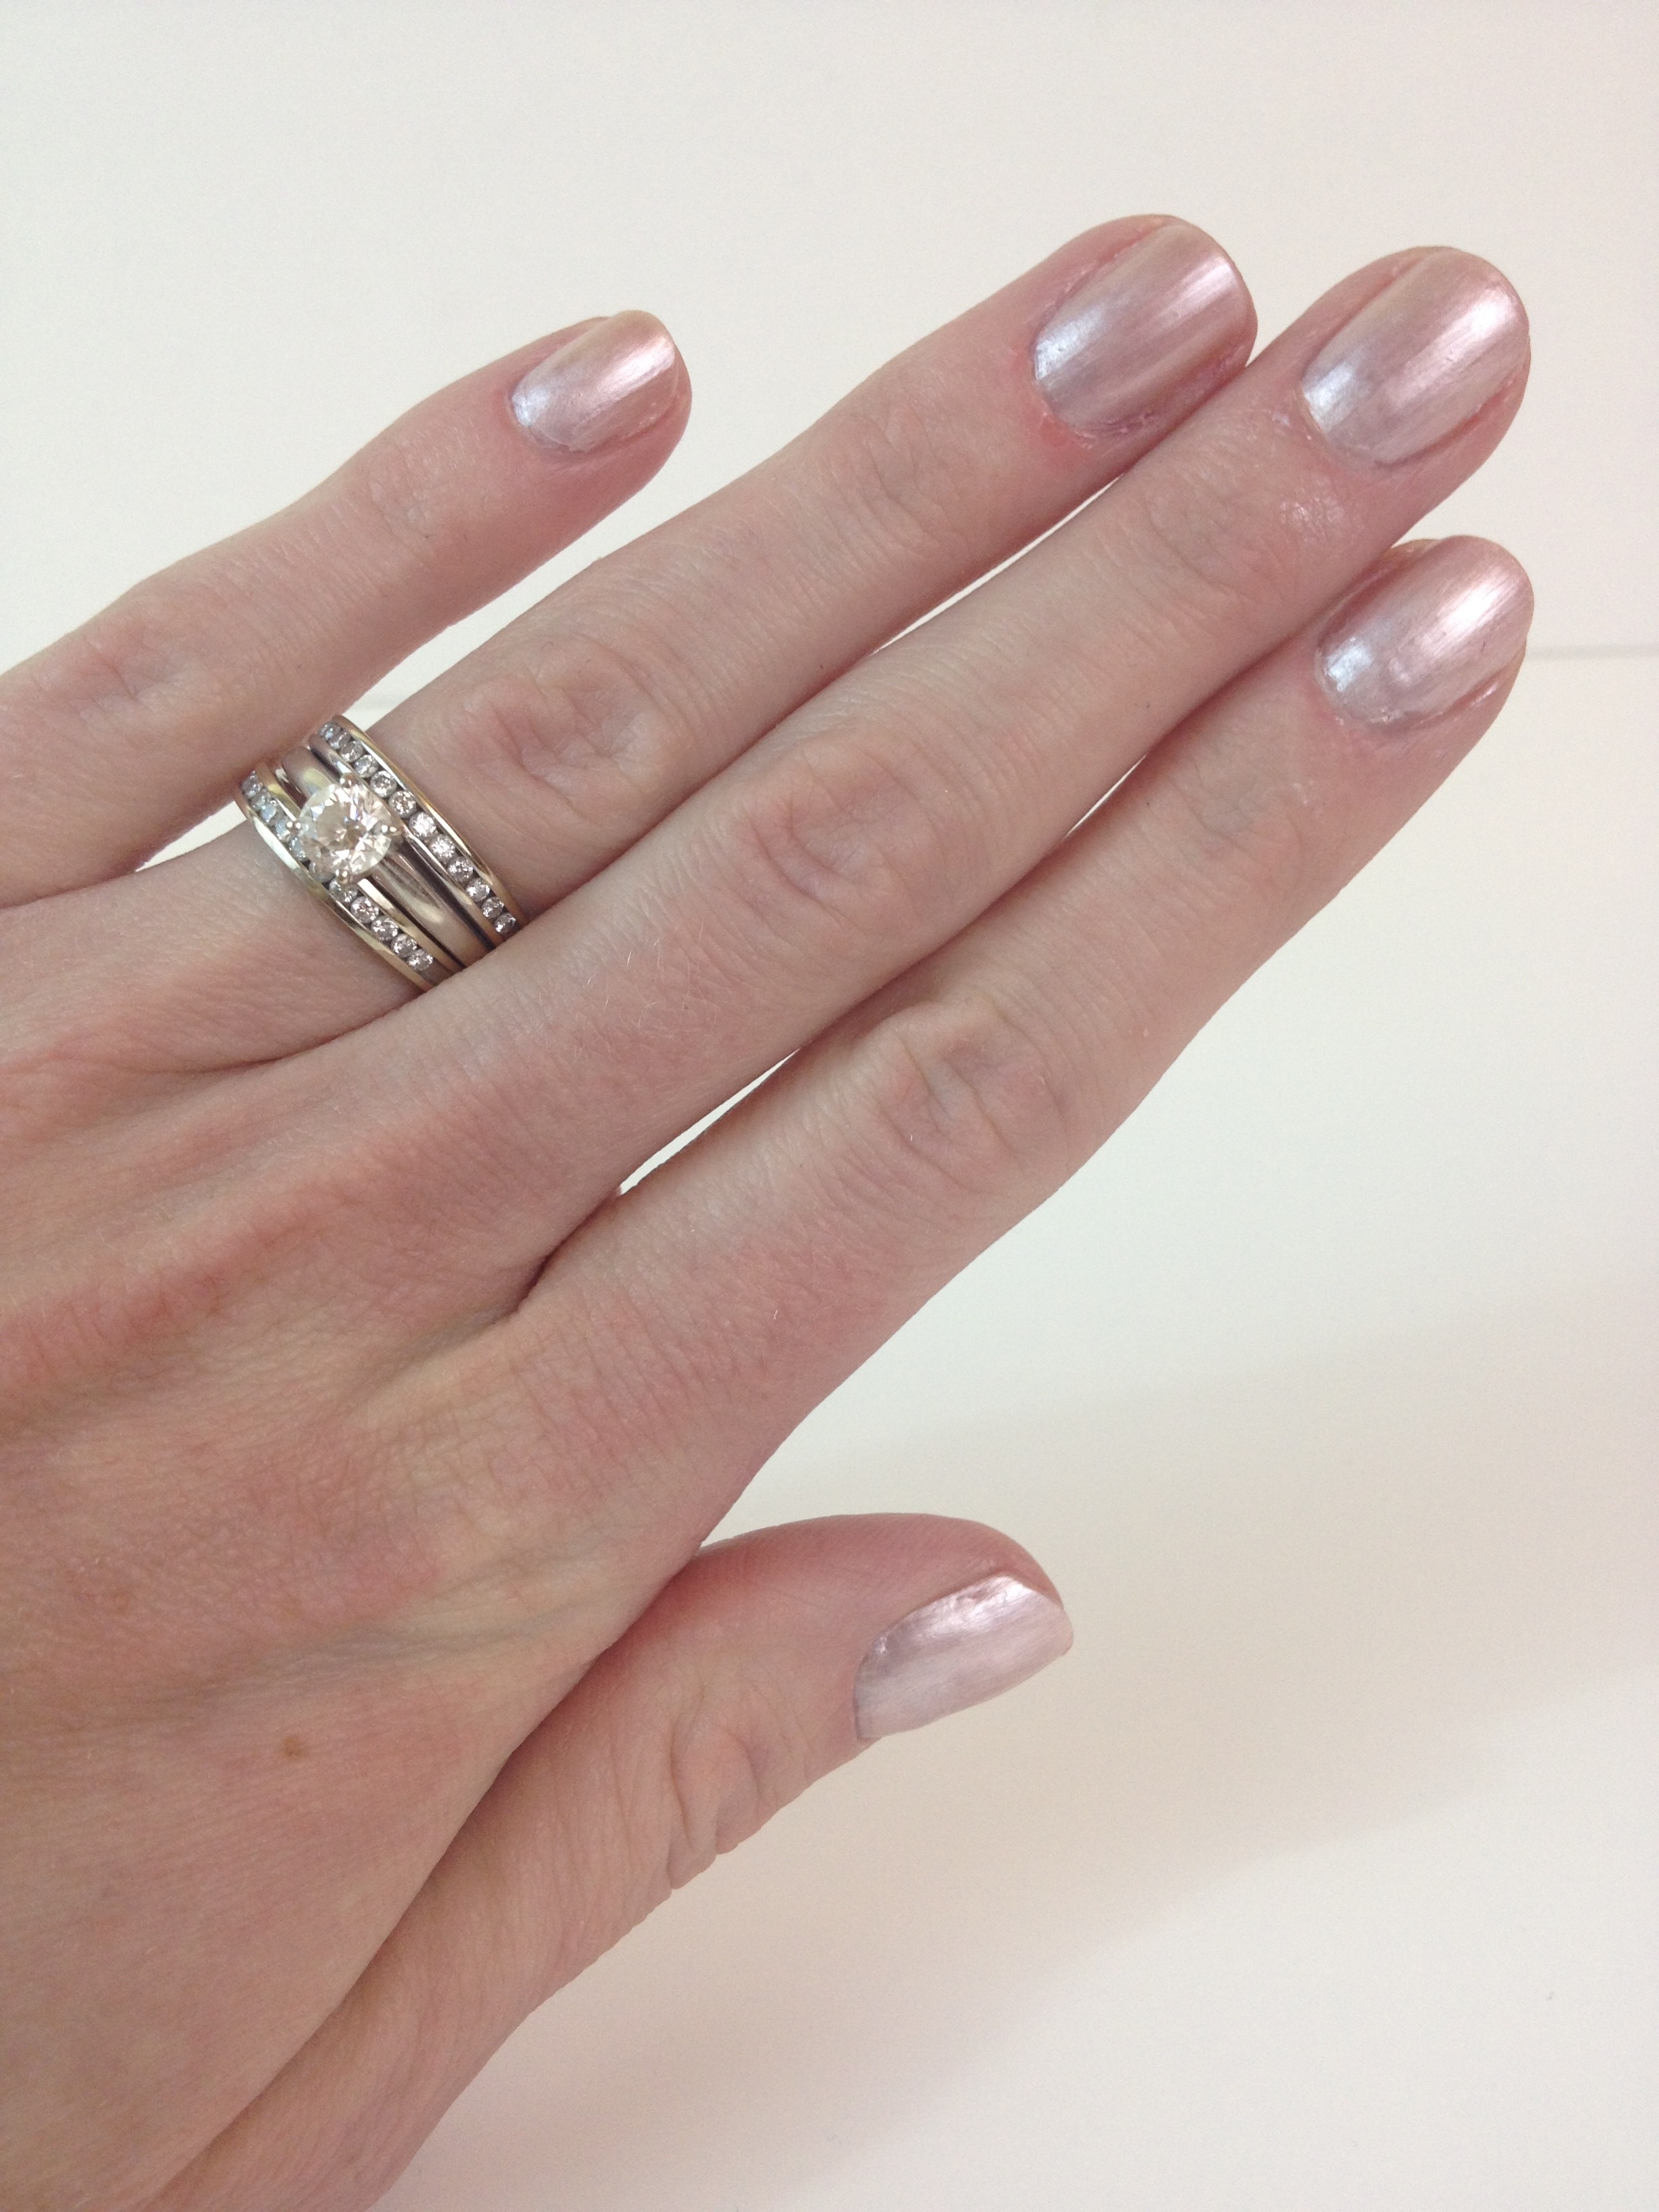
My application isn’t perfect, and it takes a little practice, but it gives you a much cleaner look and you don’t see such obvious brush strokes. I like this method because it doesn’t take too many extra steps or too many coats of different nail products to get the desired effect.


I hope that you enjoyed this quick and easy nail polish tutorial! What is your favorite nail polish type? What is your favorite nail polish secret? I love crème nail polishes finishes and usually gravitate to those, but trying a frost is a fun change! If you have any questions or comments, please let me know by commenting (click the link by the title of this post!) or find me on Facebook, Twitter, or Instagram! If you liked this post please subscribe (it’ll only take a minute!) by entering your email into the subscription box on the right side on this page. Thank you so much for reading this! I hope that you have a wonderful Easter if you celebrate and a fab weekend!!! MUAH!

FacebookTwitterEmailPinterestShare

Filed Under: Beauty Tagged With: beauty, beauty blogger, beauty tips, blogger, easy nail fix, easy nail tutuorial, frost nail polish, leah tackles, love, nail polish, nail polish sponge technique, nail tutorial, nails, sponge applicator for nails, subscribe, tutorial

TOP 10 NAIL POLISH PICKS FOR SPRING 2014!

April 11, 2014 & Leave a Comment

Hi there! Happy Friday!!

I hope you had a wonderful week! Now that spring is here, I have been loving wearing all sorts of fun nail polish colors! I looked through my collection of polishes (I have a serious love for nail polish. Serious.) and picked out my top picks to share with you today. I created a Luvocracy Collection if you’d like more information on the polishes, want to add them to your own collections, or shop directly from the site.

Note: These are not listed in any kind of ranked order, they are just done in the order of a pretty spring-y rainbow! I also love my Megalast polishes dearly, and my spring picks I posted about previously:  Wet N’ Wild Limited Edition Spring 2014  “And The Style Award Goes To…”.


top-10-spring-nail-polish-picks.jpeg


1) Essie Madison Ave-Hue


essie-madison-ave-hue.jpeg


This is a beautiful bright pink polish from the spring 2013 line from Essie. It has a beautiful pink and silver sparkle to it. It is very bright and has great color payoff. This shows 2 coats.


2) Lóreal Wishful Pinking


loreal-wishful-pinking.jpeg


This is a very light pink polish that gives your nails a beautiful, clean look. It applies flawlessly and you really can’t mess it up. I love this when I’m in a rush but want something polished on my nails.  This shows 3 coats.


3) Essie Mango Bango


essie-mango-bango.jpeg


This is a beautiful coral-y to orange cream polish. I don’t have many orange polishes, but I LOVE this one! Orange is so on trend for spring and summer, and it is a great way to get that pop of color if you aren’t ready to try an orange lip. This shows 3 coats, but you can easily do 2.


4) Revlon Colorstay Buttercup


revlon-buttercup.jpeg


Buttercup is a beautiful pale yellow cream polish. It is a unique color, as pale yellows can be hard to come by. I love it because it has good color payoff, especially for a yellow polish, and isn’t too streaky. I did apply 3 coats.


5) Revlon Zealous


revlon-zealous.jpeg


When I first got this color last summer I remember being so surprised at how much I ended up loving it on my nails! It is a yellow with lots of gold shimmer that definitely gives off echoes of a chartreuse green. I love it! It’s sheer, but looks great with 3 coats.


6) Revlon Parfumerie Lime Basil


revlon-parfumarie-lime-basil.jpeg


This is a deep minty green cream polish that smells just like a lemon lime soda! I was expecting it to smell more herbal, but all I get when I smell it is soda pop! But I like it. It is a beautiful color and it wore very well on my nails.


7)  Zoya Blu


zoya-blu.jpeg


This is such a stunning, very light blue cream nail polish. It looks gorgeous on the nail, and I always receive compliments when I wear this color.


8) Essie Play Date


essie-playdate.jpeg


I love purple nail polish shades and this one isn’t like any others that I have in my collection. It is a bright purple cream polish and is very opaque on the nail.


9) Sally Hansen Xtreme Wear Coin Flip


sally-hansen-xtreme-wear-coin-flip.jepg


I love this for any season really, but I love the metallic look that this foil polish gives. It’s mostly gold, but in some lights looks silver as well. It reminds me a lot of Orly Rage. It’s more fun than a neutral (and I love a good nude manicure!) but I find that it really goes with so much.


10) Nicole by O•P•I  Lips Are Dripping Honey


nicole-by-OPI-lips-are-dripping-honey.jpeg


I love using this color from the limited edition Carrie Underwood line as an accent to other polishes. It is a beautiful glitter polish with tiny gold glitter and holographic larger pieces of gold glitter. The mix of holographic glitter and tiny specs of glitter gives the look in some light of a rose gold polish which makes me love it that much more! I LOVE rose gold! I don’t find that this is a pain to lay down on the nail, and it’s easier to work with than a lot of glitters.


Ta-da! That’s it! What are your favorite nail polishes to wear in the spring? I would LOVE to hear from you and try out some of your suggestions!! Let me know in the comments (click the link next to the title of this post) or find me on Facebook , Twitter, or Instagram! If you have enjoyed this post, please share it with your friends and subscribe (enter your email in the box on the right of the page and you’ll just get emails when I post!). I hope you have a fantastic weekend!!

FacebookTwitterEmailPinterestShare

Filed Under: Beauty Tagged With: beauty, blog, blogger, essie, leah tackles, nail laquer, nail polish, nicole by opi, opi, pretty colors, revlon, sally hansen, spring 2014, style, top 10 nail polish colors, top picks, zoya

Easy Apothecary Jar DIY Project!!

April 7, 2014 & 1 Comment

Hi There!! Happy Monday!

Today I have a super simple DIY project to share with you using apothecary jars. If you’re not familiar with the name, apothecary jars were originally used to mix medicines by an apothecary (a person who mixed medicine), but today are used as decorative displays that you would probably recognize if you saw them.  I first started seeing all of the fun decor ideas out there using apothecary jars back when I was planning my wedding about 5 years ago. I loved them so much that I asked if they could be used at one of my bridal showers for a candy buffet. I know that lots of people use them for showers, weddings, or parties, so you may have some yourself or know somebody who has a bunch lying around. If not, they are available at Michael’s, Hobby Lobby, or other craft stores.


apothecary-diy-glitter.jpeg


I am a lover of glittery, sparkly, beautiful things done in a grown up way! This can be hard to achieve and somebody who inspires me and does this so well is Lauren, the owner of Pearls and Pastries. Once I finish the gallery wall above my desk, I will talk more about her and her fabulous style. I have a cheap faux pearl necklace from Forever 21 that I don’t reach for anymore and that is what started the wheels turning for this DIY. I put the pearls in a mason jar on my desk and loved it! So I went out and bought a few supplies and created the newest edition to my desk. I also pinned other ideas that I love for apothecary jar displays on my Pinterest! If you like this post, please hover over any of the pictures and click the pink “pin” button to put it on your own Pinterest page.


SUPPLIES:

An apothecary jar (or a de-potted candle or mason jar would work as well. If you’d like a tutorial on de-potting your candles, please comment (click on the link by the title of this post) or ask me on Facebook, Twitter, or Instagram!

Pearls, beads, rhinestones, and sequins


WHAT I PURCHASED:


apothecary-jar-diy.jpeg


Note: I purchased all of these at Walmart in the crafting section if you’re looking for the same items, but next time I plan to check out a speciality bead shop that is nearby for more choices. Any craft store or big box store would most likely have all of these types of items.

2 small tubes of gold sequins for $1.50 each

3 packs of pearl beads (975 beads) for $3.97 each

2 packs of plastic “princess” beads (approximately 450 beads) for $3.97 each

1 box of acrylic jewels (approximately 300 rhinestones) for about $6

1 apothecary jar that I already had (about $10-30 at Hobby Lobby depending on size)

STEP 1:

I took my time pouring the different beads and rhinestones into the jar, alternating them carefully so that there was enough of each layer to see them all.

STEP 2:

Once all of the beads and rhinestones were in the jar I used my fingers, a capped pen, and craft tweezers (all worked, but the tweezers helped the most for further down in the jar) to turn around the rhinestones where the bling side wasn’t showing. You could skip this step if you don’t use rhinestones or if it doesn’t bother you.

STEP 3:

Enjoy your new decoration! I put mine on my desk, with all my other girlie favorites, but this would also look beautiful as a centerpiece, on a shelf, or a bookcase. Please keep in mind if you have pets or small children that this is basically a jar filled with 1000’s of choking hazards, so keep it in a place that is out of reach!


photo 3 (10)


I hope you have enjoyed this short and sweet DIY project! If you try this out, or another projects using apothecary jars I would LOVE to hear about them or see them!! Comment down below (click the link by the title of this post) or find me on Facebook, Twitter, or Instagram! Stay tuned Wednesday this week for a simple Easter/springtime candy that looks as good as it tastes. As always, please share this post on social media if you’ve liked it and subscribe by entering your email in the box on the right side of this page! I hope you have a fantastic week!


FacebookTwitterEmailPinterestShare

Filed Under: DIY Projects Tagged With: apothecary diy, apothecary jars, decor, diy, diy project, do it yourself, easy diy, fun diy, girly, glitter, hobby lobby, leah tackles, michaels, pearlized, pearls, rhinestones, sequin

Collective Beauty and Lifestyle Favorites!

April 4, 2014 & Leave a Comment

Hi there! Happy Friday!!

Yay! It’s Friday!! I am so glad it’s the weekend! For those of you without weekends, I sympathize! Both my husband and myself had jobs post-college where weekends didn’t exist! No fun! But no matter what you do, I hope you’re having a lovely Friday afternoon! Because of my excitement for Friday, I want to do a fun favorites post where I share all of the stuff I’ve been loving lately! Eventually, I plan to do a monthly beauty favorites post, and also a “lifestyle” favorites post where I show you all the other random things I love that aren’t beauty related. But today, these favorites are all going to be packed into one post! I made Luvocracy collection with the items listed below if you want more information or want to shop online!


Let’s get started!

LEAH’S FAVORITES:


collective-favorites-beauty-lifestyle.jpeg


Beauty Favorites:

Revlon Just Bitten Kissable Balm Stain in 001 Honey


revlon-kissable-balm-stain-honey.jpeg


These jumbo crayon lip products are everywhere right now, and this is a great basic to have. It is one of my favorite lip products of all time! I have been using it for about a year and half, I still find myself wearing it at least once a week! Sometimes I just don’t feel like fussing with a lipstick or gloss, and on those days this is an amazing thing to be able to reach for. I need to pick up a new one, mine has a crack in the cap and the writing it all rubbed off…and that’s because this has gone everywhere with me! It’s a beautiful “your lips but better” pink. I find that the color ends up getting a bit brighter after the “stain” part starts coming through, but it’s still just as beautiful. When I use this I only touch up a couple of times a day to keep the slightly glossy look. If you don’t have this yet, I really suggest picking it up if you’re in the market for an easy everyday lipcolor.


This next picture shows the Revlon Kissable Balm Stain in Honey and the next item I talk about, the Lóréal Lineur Intense in Carbon Black:


makeup-swatches.jpeg


Lóréal Lineur Intense in Carbon Black


loreal-carbon-black-lineur-intense.jpeg


This is a felt tip black eyeliner that can create thin lines to very thick bold lines. I am no expert at winged eyeliner, but I definitely have success when I use this eyeliner. It is very black and stays all day. I haven’t had issues with the pen drying out too quickly. What is your favorite staple eyeliner? Do you prefer liquid eyeliner over pencil? Let me know by commenting (click the link next to the title of this post) or find me on Facebook, Twitter, or Instagram!


Hourglass Ambient Lighting Blush in Dim Infusion


hourglass-ambient-blush.jpeg


I just hauled this in my March 2014 Collective Beauty Haul, so I won’t spend too much time on it but I had to include it! This color is BEAUTIFUL! It gives such a lovely flush to the cheeks and I don’t have to wear a highlight when I have this on (but let’s be real, I usually still do! I love a good glow!).  This is gorgeous, and if you can get your booty to Sephora to swatch these for yourself, I highly recommend it!


Sally Hansen Hard As Nails Xtreme Wear Nail Color in Mint Sorbet


sallyhansen-mintsorbet.jpeg


I really like the Xtreme Wear line from Sally Hansen because it is very inexpensive and usually wears well for several days without chips. My good friend and fellow nail polish lover (sorry for getting you hooked and enabling you!! You know who you are!) gave me this color and it is just the perfect mint polish! I love the color mint green anytime, but springtime is the perfect time to rock a mint mani.


Jewelry Favorite:

Bauble Bar Deco Strand in Mint Tortoise


bauble-bar-statement-necklace.jpeg


leahtackles-springphoto.jpeg


I have loved tortoise since I was a really little kid. Once before we left for a vacation my mom and I went shopping and she ended up buying me a pair of tortoise sunglasses…I must have been 7 or 8 years old, and I’ve been loving tortoise ever since! So this necklace fulfills my love of tortoise, a pop of spring color with the mint, and a little bling thrown in for good measure. It looks cute with so many things: A basic tee, a  dress, or a great collared shirt. I wore it this past weekend with a casual outfit shown above. It is a bit expensive, but I was able to use  Bauble Bar Vault Points to get it for less. Keep you eyes peeled for discount codes and sign up for vault points


Food Favorite:

Nature Valley Sweet & Salty Nut Bar in Roasted Mixed Nut


nature-valley-bar.jpeg


I like to have granola or protein bars in my bag in case I get hungry or “something” happens! Maybe it’s the mom in me! These are a great mix of salty and sweet with lots of nuts and nutty butter on the bottom of the bar.


Exercise/ Wellness Favorite:

Life Factory 16 oz. Glass Bottle with Straw Cap and Silicone Sleeve in Peony


lifefactory-bottle.jpeg


I got this while I was shopping in a small local children’s boutique for my kiddos. I drink lots of water and wanted a bottle that I can take everywhere without spilling. It’s a bit heavy, because it is made of glass but it is free of chemicals and easy to clean. I really like the silicone around the glass because it gives a great grip. It is pricy, but if you consider cost per use, it has stayed in perfect shape and I use it all day, everyday.


Website Favorite AND Book Favorite:

“Seriously…I’m Kidding” by Ellen Degeneres read by the author 

My hubster has been using audible.com for about a year, but I just didn’t know if I would like it or when I would find the time. I finally decided to listen while I was doing random household chores one evening recently and I chose Ellen’s book for something lighthearted to begin my audio book journey. And I loved it! It didn’t hurt that I listened to this straight after Ellen rocked The Oscars, but she is just so charming. I felt  warm and fuzzy after listening. I finished the about three hour long book in two days and it made my chores a lot more fun. We have an Amazon Prime account which makes it very affordable as well.  I loved the book and I loved listening to it instead of finding the time to read it.


Girl Power Favorite:

NOTE: I thought this would be a fun way to share some props when I do a favorites post to any girl I think is doing great stuff and should be recognized. I am all about girl power, more than ever now that I have a daughter of my own! I think it should be encouraged and supported!

Carrie Rad has Youtube channel   I found recently that I think is just lovely! She’s got whatever it is (okay, now I can’t stop singing that country song…), something about her is so fresh, and she is a joy to watch. I found her and then binge watched every single one of her videos. She has beauty, fashion, and more in her videos.  I just want to grab a coffee with her and hang out. She has great ideas, shows such passion, and I just know she will do big things! Carrie Rad is rad!

Song Favorite:

All of Me by John Legend

This song is SO beautiful! I love it each time it comes on the radio and avoid talking too much until it’s over. LOVE!


Okay, I don’t want this to go on forever because I’m in a rambling mood today, and that could get dangerous! But I really hope that you’ve enjoyed this post! As always, if you have any comments or questions please comment (click the link next to the title of this post) or find me on Facebook, Twitter, or Instagram! Please let me know what type of posts you would like to see on www.leahtackles.com. Let me know what your favorites items of the moment are! I would love to hear about them! And if you like what you’ve read, please share and subscribe by entering you email into the box on the right of this page! You will only get emails when a new post from me goes up! Super easy! Thank you to all of you who have already subscribed!! I hope you have a beautiful weekend!!

FacebookTwitterEmailPinterestShare

Filed Under: Beauty, Fashion Tagged With: all of me, audible, audio book, bauble bar, beauty, beauty favorites, blog, blogger, carbon black eyeliner, carrie rad, collective favorites, ellen degeneres, fashion, favorite song, favorites, girl power, hourglass, hourglass ambient blush, john legend, jumbo lip crayons, leah tackles, lifefactory, lifestyle, lifestyle favorites, mint nail polish, nail polish, nature valley, revlon, revlon kissable balm stains, sally hansen mint sorbet, springtime, statement necklace, tortoise necklace, water bottle

Easter Basket Cupcakes-Hopping Into Spring Series Part 1

April 2, 2014 & 2 Comments

Hi there! Happy Wednesday!

I typically wouldn’t do two food posts right in row, but I decided to do a mini series: Hopping Into Spring.  This series will  feature  springtime treats just in time for some warmer weather and Easter! I was flipping through my Taste of Home Magazine and browsing some fun websites recently and became inspired by all the springtime yummy cuteness. The next three Wednesday posts will be part of the series, that way they will all go up before Easter so that you can make them for your families, friends, or coworkers. If you don’t celebrate Easter, all of these treats are really just springtime goodies that can work for any occasion! If you like this post, please pin it to your Pinterest page, simply hover  over any of the pictures until a pink “pin” button appears, then click on that to pin to your Pinterest account.


EASTER BASKET CUPCAKES:


easter-basket-cupcakes.jpeg


I found these Easter Basket Cupcakes in Taste of Home Magazine and knew right away that I had to recreate them! I really like Taste of Home because they offer a wide variety of recipes, but it is always with ingredients that are easily accessible and simple directions.  My daughter, Hailey, loved helping me stir and pour in the long list of ingredients for these! If you are pinched for time, you can buy a boxed cake mix or canned frosting but still decorate these sweet little baskets. This would also be a great opportunity to use my cupcake wrapper diy with a sweet springtime paper!


CARROT CAKE:

Ingredients:

4 eggs

1 cup sugar

1 cup packed brown sugar

1 cup canola oil

3 teaspoons vanilla extract

3 cups all-purpose flour

2 teaspoons baking powder

2 teaspoons ground cinnamon

1 teaspoon salt

1 teaspoon baking soda

1/2 teaspoon ground ginger

1/4  teaspoon ground nutmeg

3/4 cup buttermilk

1 lb carrots, grated

2 cups chopped walnuts, toasted

1 can (8 oz.) crushed pineapple, drained

1 cup flaked coconut


CREAM CHEESE FROSTING:

1 package (8oz.) cream cheese, softened

1/2 cup butter, softened

1 teaspoon grated orange peal

1 teaspoon vanilla extract

4 cups confectioners’ sugar


DECORATIONS:

3 cups flaked coconut

1 teaspoon water

6-10 drops green food coloring

Candy Eggs (jelly beans or small chocolate eggs, whatever type you prefer)

Candy Straw (Sour Punch Straws worked well, licorice would also work. TIP: Do not use any really thin candy because you need something to stick into the cupcake so the “handle” of your basket stays up)


CARROT CAKE DIRECTIONS:

Preheat your oven to 350°. Line 25-30 muffin cups with paper liners. In a large bowl, beat eggs, sugars, canola oil and vanilla until well blended. In another bowl, whisk flour, baking powder, cinnamon, salt, baking soda, ground ginger and ground nutmeg.  Add your dry mixture and your buttermilk to your egg mixture, alternating and blending after each addition. Stir in the carrots, walnuts, pineapple and coconut until well blended. Do not over mix. Fill prepared baking cups about 3/4 full. Bake 20-25 minutes or until a toothpick inserted into the center of a cupcake comes out clean. Cool in pans for 10 minutes before removing and cooling completely on wire racks.


CREAM CHEESE FROSTING DIRECTIONS:

In a large bowl, beat cream cheese and butter until well blended. Beat in the orange peel and vanilla extract. Slowly beat in confectioners’ sugar until smooth. Frost you cupcakes. Because you are going to be covering the frosting with coconut and then decorating them, the frosting doesn’t have to be perfect and you can use a pretty thin layer. I was able to quickly frost the cupcakes I made using a butter knife.


DECORATING DIRECTIONS AND TIPS:


easter-basket-cupcake-2.jpeg


To make the Easter Basket grass, simply put your flaked coconut into a large resealable plastic bag and mix in the water and food coloring. Seal and shake until the coconut is evenly tinted. Do this a little bit at a time because you can always add more drops of food coloring if needed. I then dipped my cupcakes into the coconut to evenly coat the tops. TIP: Put your candy straw about 1/4 inch from the edge of the cupcake and push into the cake. I made the mistake at first of trying this too close to the edge and it didn’t stay very well. Then decorate with your candy eggs. Ta-da! An adorable Easter or springtime cupcake!


easter-cupcake.jpeg


I hope you have enjoyed this post! What desserts do you like to make this time of year? Is there anything you’d like to see me make on www.leahtackles.com?  If you try this recipe, I want to hear about it! And if you have any questions or comments please let me know in the comments (click the link by the title of this post) or find me on Facebook, Twitter, or Instagram! I would love to hear from YOU! It’s “LeahTackles” on all social media. Thank you very much for reading this, and if you like this post please subscribe by entering your email into the subscription box on the right hand side of this page to receive emails only when I post something new! Have a wonderful rest of your week!

FacebookTwitterEmailPinterestShare

Filed Under: Cooking Tagged With: cupcakes, easter basket cupcakes, easter diy, easter treats, holiday cupcakes, hopping into spring, leah tackles, springtime, springtime cupcakes, yumminess

Easy Smoothie Recipes

March 31, 2014 & Leave a Comment

Hi there! Happy Monday!

The sun is shining here today which is making this week start off right! I hope the sun is shining where you are, too. I try to be reasonably healthy, and during the week it’s usually pretty easy for me, but the weekends are filled with a lot more temptation. Because of that, I start almost every Monday morning off with some sort of healthy breakfast smoothie. I have always loved smoothies, and would buy them occasionally, but that got pricy! My husband and I got a Ninja Professional Blender with Single Serve for Christmas this past year and I started making smoothies at home. If you would like a review or more information on the Ninja Blender, please leave me a comment (click the link next to the title of this post), or find me on Facebook, Twitter, or Instagram! I like that I know what’s going in my smoothie when I make it at home. I also like that I can get so many fruit and veggie servings in so easily. Today I want to share two simple smoothies with you that I have been making on a regular basis.


easy-smoothie-recipes.jpeg


SIMPLE YOGURT FRUIT SMOOTHIE:


 easy-smoothie-recipe-1.jpeg


Serves 2

Prep Time: 3 Minutes

Blend Time: 1 Minute


What you need:

A blender

A glass

A straw *optional


Ingredients:

Ingredients:

1 cup of orange juice (any juice you prefer is fine)

1/3 cup strawberry greek yogurt (regular yogurt is also fine or a different flavor)

1/2 of a ripe banana

1/2 cup of ice

1/2 cup of frozen fruit (I used a  strawberry and banana mix)

Directions:

Add everything into your blender and blend until smooth. Enjoying with a fun straw is completely necessary!


FRUIT PARFAIT SMOOTHIE:


easy-parfait-smoothie.jpeg


Serves 2

Prep Time: 5 Minutes

Blend Time: 1 Minute


What you need:

A blender

A glass

A straw *optional


Ingredients:

1 ripe banana

5 strawberries ( fresh is best but frozen is also okay)

1/4 cup raspberries ( fresh is best but frozen is also okay)

1/2 cup almond milk (regular milk is also fine)

1/2 cup granola

Directions:

Blend the fruit and the milk until smooth. Pour your smoothie into a glass and top with the granola. I usually eat this with a spoon at first before switching to a (fun!) straw.


easy-smoothie-pic.jpeg


Finally, take a mandatory silly picture showing how much you’re enjoying your smoothie!

Okay, that’s it! I hope you enjoy these easy smoothie recipes!! Please comment (click the link next to the title of this post) or find me on Facebook, Twitter, or Instagram if you try either of these recipes out or would like to see other smoothie recipes! I have some with veggies, protein powder…and I could always do a dessert smoothie as well! I hope your week is off to an amazing start! Thank you for being here as always, and please share and subscribe if you’ve enjoyed this post!


FacebookTwitterEmailPinterestShare

Filed Under: Cooking Tagged With: almond milk, blender, blog, blogger, easy recipe, easy smoothie recipes, fresh start, greek yogurt, health, healthy, healthy breakfast, leah tackles, morning, ninja blender, parfait, simple smoothie, smoothie, smoothies

« Previous Page

SUBSCRIBE

Leave your email to subscribe!

SEARCH

SPONSORS

ARCHIVES

GRAB MY BUTTON


copy & paste code

site design by The Kinch Life Design & development by Olive & Ivy Design