Leah Tackles

  • Home
  • About
  • Policy
  • Beauty
  • Fashion
  • Cooking
  • Exercise
  • DIY Projects
  • Decor
  • Book Club
  • Family

Ombré Lips in Minutes! NYX Ombré Lip Duo Review

January 18, 2017 & Leave a Comment

Hi there! Happy Wednesday!

If you follow beauty trends on social media then you have probably seen pictures on social media of the very popular ombré lip and I was intrigued when I saw that NYX, a fairly affordable brand that I like a lot of products from, came out with a product that claims to give you the ombré lip look without spending 15 minutes on your lipstick. So, today I want to share with you my thoughts on the product.
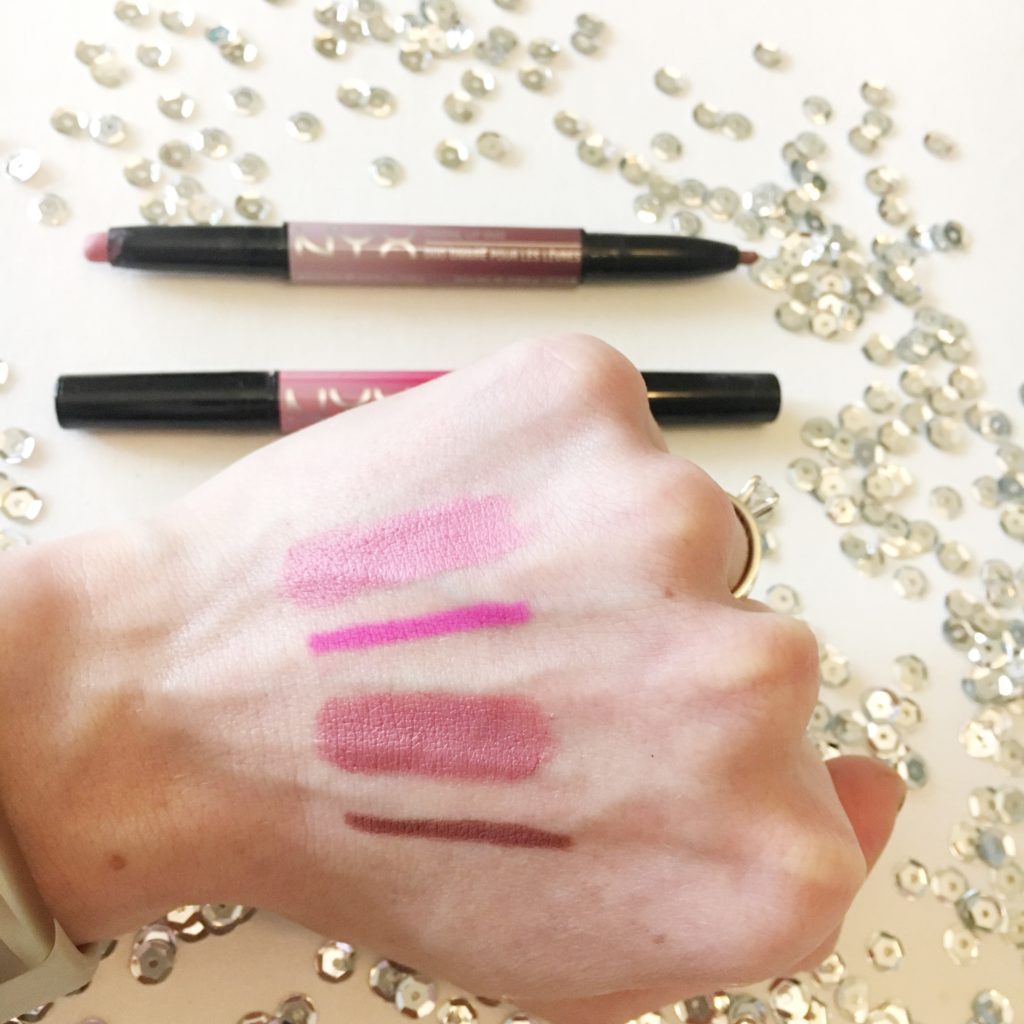
 

NYX Ombré Lip Duo

ombreliptutorial-howtoombrelip-leahtackles.jpeg

NYXombrelipduo-review-leahtackles.jpeg

nyxombrelipduoreview-leahtackles.jpeg

Pink Bubbles & Caviar 

Rags & Riches

What Is it?

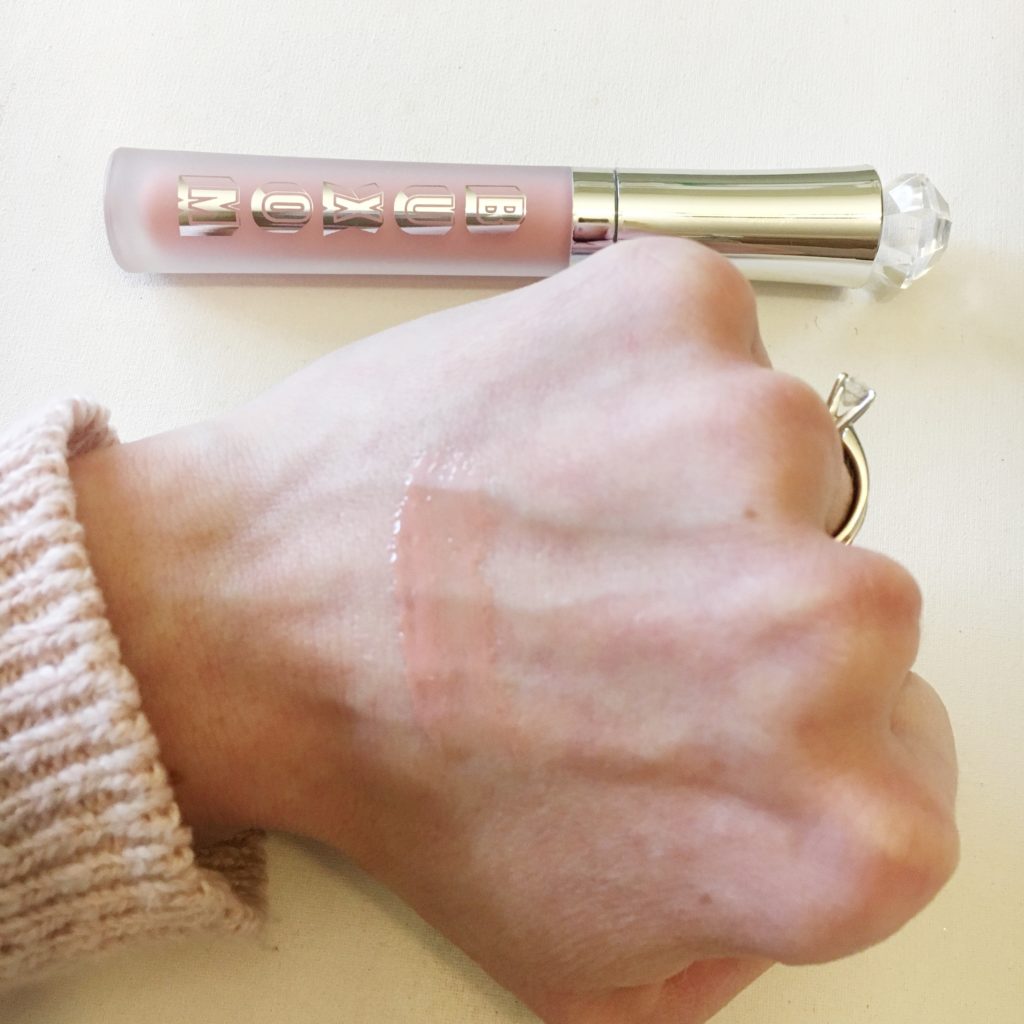
The NYX Ombré Lip Duo is a dual ended product containing both a satin matte lipstick and a lip liner. The lipstick color and the lip liner are colors that are meant to go together to create the perfect ombré pout. The lipstick formula is said to be creamy and therefore easy to blend to get the desired look.

My Thoughts

I really love products that are two in one like this because it is just so handy to have a lip liner created to match a lipstick, whether or not you want to get that ombré look. I found the lipliner to be very easy to apply and I like that it didn’t tug on my lips. The lipstick is very creamy and without any effort the lipstick and lip liner blended beautifully. Did my lips look like Instagram perfection? No, but they definitely had the general ombré idea without any work. I think that this is a great product if you want to play around with an ombré lip look without having to try to coordinate colors on your own. I also think this is a great option if you’re just looking for complimentary liner and lipstick combos. I will say that while I love how easy the creamy formula applies and blends, it may be a bit *too* creamy because while I was taking the product shot photos the lipstick broke off while twisting it up.

Have you tried this product? What is your favorite NYX product? Do you like the ombré lip trend? Let me know in the comments! Have a fantastic day and please don’t forget to subscribe! : )

FacebookTwitterEmailPinterestShare

Filed Under: Beauty Tagged With: beauty blogger, beauty review, Beauty Vlogger, Easy Ombre Lip, leahtackles, makeup review, NYX Ombre Lip Duo, NYX Ombre Lip Duo Pink Bubbles & Caviar, NYX Ombre Lip Duo Rags & Riches, NYX Ombre Lip Duo Review, Ombre Lip Duo Review, Ombre Lip Product, Ombre Lip Tutorial, Ombre Lips

HOW I WHITENED MY SENSITIVE TEETH! SMILE BRILLIANT REVIEW + GIVEAWAY WITH VIDEO DEMO

January 9, 2017 & 1 Comment

Hi there! Happy Monday!

I hope that you had a wonderful weekend! I am so excited to share with you how I whitened my sensitive teeth at home with Smile Brilliant. Smile Brilliant did reach out to me, provided this kit to me for consideration for review, and are hosting my giveaway. As always, all opinions are my own and I would never accept money in exchange for a positive review. If you have any questions please let me know in the comments or reach out on any of my social media, which is linked at the top of my blog and at the bottom of each post! Smile Brilliant also has a fantastic live chat on their website.

About Smile Brilliant

Smile Brilliant offers six different kits, three kits for teeth that are not sensitive and three kits for sensitive teeth. I was sent the T9 Sensitive Teeth kit. Kits from Smile Brilliant start at $129 and go up to $179 which is a fantastic value compared to professional teeth whitening at the dentist office! I do have a coupon code “leahtackles5” which will save you 5% off.

Shop Smile Brilliant 

http://www.smilebrilliant.com/product/teeth-whitening-trays#leahtackles

How It Works

You receive a box in the mail from Smile Brilliant with instructions to make the molds for your custom whitening trays. I was intimidated to make the molds and send them back in the mail, but as you can see in my video demo below it is not as hard as I anticipated at all. About a week after you send in your molds you will get your custom whitening trays. The molds fit my teeth perfect and are very flexible and comfortable. The kit comes with great directions, but basically all you do is put a thin a line of the whitening gel into the molds and then wear them for anywhere from 30 minutes to 3 hours. If you have sensitive teeth like me and purchase a sensitive teeth kit, you will also get desensitizing gel which I did use when I would whiten my teeth for longer than an hour. The desensitizing gel is used for about 20 minutes after whitening to help with sensitivity and also prevent re-staining the teeth.

Enter My Giveaway

Watch My Video Demo and Review

https://www.smilebrilliant.com/g/leahtackles

Before and After

smilebrilliant-beforeandafter-results-leahtackles.jpeg

My Results After 7 Applications

smilebrilliant-review-giveaway-leahtackles.jpeg

smilebrilliant-review-beforeandafter-leahtackles.jpeg

Read Smile Brilliant Reviews

Benefits of Custom Trays

7 Things To Know BEFORE Whitening Teeth

Tooth Sensitivity Causes and Solutions


I am THRILLED with my results! This kit was easy to use and came with plenty of syringes to use every few months to maintain the results. My husband, Stephan, wants to try the kit now too! If he does, I will definitely share his results as well. If you try the kit, PLEASE let me know or tag me on social media!! xx


Teeth Whitening

FacebookTwitterEmailPinterestShare

Filed Under: Beauty Tagged With: Affordable Professional Teeth Whitening, Affordable Teeth Whitening, beauty blogger, Beauty Vlogger, How I Whitened My Sensitive Teeth, How To Whiten Teeth At Home, LeahTackels Teeth Whitening, Professional Teeth Whitening At Home, Smile Brilliant, Smile Brilliant Giveaway, Smile Brilliant Results, Smile Brilliant Review, Teeth Whitening, Teeth Whitening At Home, Teeth Whitening For Sensitive Teeth, Teeth Whitening Giveaway, Teeth Whitening Kit, Teeth Whitening Review

HOW TO APPLY FALSE LASHES!

January 4, 2017 & Leave a Comment

Hi there! Happy Wednesday!

I hope that you are having a great week so far! I have been getting comments on some of my YouTube videos and Instagram pictures asking if I’m wearing false eyelashes or what lashes I am wearing. Up until about a year ago, I really only wore false eyelashes a handful of times in my entire life, but this past year I’ve been using them while filming certain videos and for special events, so today I decided to tell you about the lashes that I use and how I apply them.


How To Apply False Lashes:

howtoapplyfalselashes-leahtackles.jpeg

Pictures Wearing False Lashes:

howtowearfalselashes-leahtackles.jpeg fullsizerender-67 fullsizerender-66

When To Wear False Lashes:

Whenever you want! I definitely am NOT a false lash every day kind of girl, but I really love the way that they look on film and in pictures. I always have very long and dark lashes naturally, but the difference that false lashes can make is pretty remarkable!

How To Apply False Lashes:

1.Once you’ve removed your lash from the packaging hold the lash up to see if it fits your lash line or needs to be trimmed. If it needs to be trimmed you can do so easily with a small pair of scissors from a manicure set. For some, like myself, the lash bands are actually not long enough so I hold the lash up and figure out where to place it so that it starts in the middle and ends on the outer part of the lash line.

2. Apply a very light layer of a mascara to help blend your lashes with the falsies. This step is optional, but I’ve tried this step and it is my preference to do this.

3. Apply a thin strip of lash glue to the band of the false lash and then let the glue dry for about 30-40 seconds.

4. This is the “tricky” step but I promise it isn’t that bad! If one side of the lash has longer lashes, that part should go on the outer corner of your eye.  Hold the lash up either with your fingers or if you prefer, with a pair of tweezers, and right about your lash line until you get in where you want set it and then put it down onto your lash line. *TIP: Apply a slightly thicker than usual line of liquid eyeliner that helps to blend the false lash band and gives you a spot to “aim” when placing the lash.

5. Check out your handy work! If the lash is sticking too far out or not where you want it to be, lift it up and try again! If you need to, apply a bit more lash glue and repeat step 3. If you are happy with how your lash looks, make sure the band is pressed down and keep your eye closed or look down for a minute so that the lash can set.

6. Use a mascara to blend your lashes with the falsies, if needed. I like to add a little bit of mascara where the lash doesn’t reach near the inner corner of my eye, and then a little bit on my bottom lashes as well.

Repeat these steps for the other eye. That’s it! I know it is a lot of steps and sounds scary, but I promise it isn’t : ) I usually do one eye super quickly, and often struggle with the other once or twice before getting it how I want it, but it’s worth it for a little added drama to your look!

If you have any questions about how I do this, please let me know! I also re-use my false lashes several times by cleaning them after use, and if you’d like to see how I do that please let me know!

My Favorite False “Natural” Lashes

My Favorite “Glamour” Lashes

My Favorite Lash Glue

My Favorite Mascara

Thank you for reading! Have a beautiful day!

FacebookTwitterEmailPinterestShare

Filed Under: Beauty Tagged With: Apply False Lashes Like a Pro, Ardell False Lashes, beauty blog, beauty blogger, Beauty Vlogger, beauty youtuber, Best False Lashes, Best Lash Glue, False Lash How-To, Glamour False Lashes, How To Apply False Lashes, Inexpensive False Lashes, Lash Tutorial, leahtackles, LeahTackles Lashes, Long Lashes, Natural Lashes, Red Cherry False Lashes, Revlon Precision Lash Glue, vlogger

YOU NEED TO TRY THIS BODY WASH! UNDER $5

December 28, 2016 & Leave a Comment

Hi there! Happy Wednesday!

Today I want to share one of my “holy grail” drugstore items that I always repurchase and always have on hand. Be sure to let me know your favorite products in the comments section because I love finding new amazing things.


Caress Evenly Gorgeous Body Wash

caressevenlygorgoeusbodywash-leahtackles.jpeg

I prefer this over other higher end body scrubs and body washes that I have tried and I always repurchase this. This is an exfoliating body wash which makes it great for sunless tanning prep or just a good deep clean, but it’s also gentle enough that it can be used daily. I like all of the scents, but my favorite is the Burnt Brown Sugar and Karite Butter. I love this because it leaves my skin feeling smooth, clean, and it’s super affordable!

Thank you for reading! Have a wonderful rest of your week and HAPPY NEW YEAR! I cannot wait for 2017! Cheers love!  xx

FacebookTwitterEmailPinterestShare

Filed Under: Beauty Tagged With: affordable body wash, beauty blog, beauty favorites, beauty tips, Beauty Vlogger, beauty youtuber, Best Body Wash Ever, caress body wash, Caress Burnt Brown Sugar & Karite Body, Caress Evenly Gorgeous Body Wash, Drugstore Body Wash, drugstore favorites, leahtackles, makeup blog, shower routine, simple beauty, Skincare Favorites, skincare review, skincare routine, skincare tips

NATURAL EFFORTLESS FOUNDATION FOR EVERY DAY! MAYBELLINE DREAM MATTE MOUSSE

December 21, 2016 & Leave a Comment

Hi there! Happy Wednesday!

The winter months include lots of social functions with friends and family starting with Christmas and holiday celebrations continuing on with things like Super Bowl parties, where I find myself wanting to look put together but not in a full-on multi step makeup routine. I have been “shopping my own stash” of makeup lately (which is how I found my current favorite Too Faced Snow Bunny Bronzer which I blogged about here). I recently rediscovered Maybelline Dream Matte Mousse Foundation and had to share it with you today!


Why I Love It:

maybelline-dream-matte-mousse-review-leahtackles.jpeg

leahtackles-everydaydrugstorefoundation-leahtackles.jpeg

maybellinedreammattemousse-review-leahtackles.jpeg

This foundation is one that I used years ago and had honestly forgotten about until I saw one of my most trusted beauty YouTubers, Emily Noel, mention it recently and I decided to give it another shot. This foundation gives me a great medium coverage without much work at all and I don’t mind the need to touch up much during the day. I will say that this isn’t as full coverage as some of my favorite foundations, but that is why I’ve been loving it lately…it’s EASY, no-fuss and looks very natural. I do like using a primer with this as I do all foundations, but I don’t find this to sink into my pores horribly if I do skip a primer. I do set this with a loose setting powder (my current favorite is the Laura Mercier Loose Setting Powder). I like applying this was an ever-so-slightly damp Beauty Blender, but it does also applying nicely with your fingers which is AWESOME when you’re in a rush or feeling a little lazy which is completely acceptable in these cold, dark months ; )

Please let me know your favorite easy, no-fuss foundation(s) in the comments! I LOVE trying new foundations, especially at awesome drugstore prices!! I hope that you have a VERY MERRY CHRISTMAS if you celebrate! Thank you so much for your support and love, it truly means the world to me! xx

FacebookTwitterEmailPinterestShare

Filed Under: Beauty Tagged With: beauty blogger, beauty tips, Beauty Vlogger, beauty youtuber, Dream Matte Mousse, Drugstore Foundation, drugstore foundation for combo skin, drugstore foundation for oily skin, easy foundation, Everyday Makeup, foundation for combo skin, Foundation Tips, leahtackles, leahtackles drugstore makeup, makeup blog, makeup tips, Matte Drugstore Foundation, Maybelline Dream Matte Mousse, maybelline dream matte mousse review, Mousse Foundation, natural foundation, simple makeup

TOO FACED SNOW BUNNY BRONZER REVIEW

December 14, 2016 & 1 Comment

Hi there! Happy Wednesday!

I hope that you have been having a fantastic week so far! Today is my middle little loves birthday! Happy 4th Birthday Connor David! I love you so! Today I want to talk about a bronzer that I used years ago and loved but somewhere along that way got lost in my drawers of makeup. A few weeks ago while decluttering my makeup collection, I pulled out a few products I wanted to try using again and the Too Faced Snow Bunny Perfecting Bronzing Powder has become a rediscovered favorite that I want to share with you today.


Too Faced Snow Bunny Bronzer

toofacedsnowbunnybronzer-leahtackles-review.jpeg

First of all this packaging is absolutely beautiful! I actually have the older packaging, but both the new and older packaging is beautiful with simple details. This one of those products that makes me happy just looking inside the compact because the beautiful shimmery shades are stunning. The bronzer is made up of four strips of color in a white highlight, a bronze, a very pale pink, and a light tan. I think that I avoided this because these days I usually use a matte bronzer or at least tend to avoid a lot of shimmer, but this is stunning! You can use this as a blush, a bronzer, or a highlight which is also great. I like that you can use the four colors separately, but I tend to twirl my brush in all four colors and then lightly dust onto my cheeks. Although this has shimmer it is a very subtle highlight and I think it’s perfect in the winter months for a very natural glow. This looks wonderful in the sunlight, especially that snowy sun reflecting light, and lasts on me all day.

Have you tried this bronzer? What bronzers do you like to wear in the winter? Leave a comment to let me know! Have a great day and please subscribe! xx

FacebookTwitterEmailPinterestShare

Filed Under: Beauty Tagged With: beauty blogger, beauty review, Beauty Vlogger, beauty youtuber, Best Winter Bronzer, leahtackles, makeup blogger, makeup review, makeup tips, Pale Skin Bronzer, Shimmering Bronzer, too faced, Too Faced Bronzer, Too Faced Perfecting Bronzing Powder, Too Faced Review, Too Faced Snow Bunny Bronzer, Too Faced Snow Bunny Bronzer Review

GO LONGER BETWEEN HAIRCUTS? LIVING PROOF SPLIT END MENDER REVIEW

December 12, 2016 & Leave a Comment

Hi there! Happy Monday!

I hope that you had a great weekend! If you’re like a lot of us, you probably don’t get your haircut the recommended every 6-8 weeks, and sometimes the ends of your hair can start looking a little rough between trims. Today I am going to be sharing my thoughts on the Living Proof Perfect Hair Hair Day Fresh Cut Split End Mender.


Living Proof Split End Mender

skipahaircut-hereishow-leahtackles.jpeg

livingproofsplitendmender-leahtackles.jpeg

What It Is

The Living Proof Split End Mender can be used on wet or dry hair to seal individual split ends so that the ends of your hair looks smooth and aligned. It also contains a conditioning layer that keeps ends sealed and soft for polished looking ends. You can start using this right after a haircut to help prevent split ends, or to treat split ends.

How I Use It

I like to apply this to the bottom few inches of my hair while it is still damp after showering. I also have used it after straightening and curling my hair when the ends look a little bit raggedy and it definitely works to smooth out my ends.

My Thoughts

livingproof-splitendmender-leahtackles.jpeg

I love that a little bit of this goes a long way and helps my split ends look smooth! I really feel like this helps get that “just left the salon” look. I really like this to treat my split ends when my hair is damp. This does work to smooth my ends after curling or straightening for a sleek look, but I can get the same effect using other serums as well. I already have added this to my “loves” list at Sephora and will continue using this to prevent and treat split ends.

Have you ever tried this or other Living Proof products? Let me know your thoughts in the comments! Have a wonderful day and don’t forget to subscribe : )

FacebookTwitterEmailPinterestShare

Filed Under: Beauty Tagged With: beauty, beauty blogger, beauty review, Beauty Vlogger, Haircare Review, leahtackles, Living Proof, Living Proof Hair Care, Living Proof Perfect hair Day, Living Proof Review, Living Proof Split End Mender, Living Proof Split End Mender Review, makeup review, skincare, skincare review, vlogger

THE BEST NUDE LIP GLOSS EVER!

December 7, 2016 & Leave a Comment

Hi there! Happy Wednesday!

I hope that you are having a wonderful week so far, and as always, thank you for taking time to read my blog! Today I am going to be sharing my absolute favorite nude lip gloss that works beautifully on any skin tone.


Buxom Full-On Lip Cream in White Russian

buxom-whiterussian-review-bestnudegloss-leahtackles.jpeg

This is called a lip cream, but feels and wears just like a lip gloss. The shade White Russian is a beautiful pink-y nude color that looks beautiful on its own or worn over lipstick. These Buxom glosses smell really good too, it isn’t too strong but it’s definitely a sweet scent when you apply it. These are formulated to give a gentle plumping effect to your lips, and also keep your lips supple with vitamins A and E. This is a great shade to add to your own collection whether you have a lot of makeup or are just starting out. I also think this is a great gift for teens all the way up to more mature women because this gloss truly flatters anyone, and doesn’t have glitter or sparkle but just a beautiful glossy look.

You can purchase Buxom White Russian here and Sephora also has an adorable limited edition packaging for the Full-On Buxom Lip Cream in White Russian Holiday Kiss Collection available but it’s currently sold out online! However, Sephora seems to re-stock these holiday stocking stuffers quite often, so if you enter your email they will email you if it comes back in-stock.

What is your favorite go-to lip gloss? This has become mine! Buxom glosses are really wonderful, and this one is far and away my favorite. Have a great day and please don’t forget to subscribe!

FacebookTwitterEmailPinterestShare

Filed Under: Beauty Tagged With: beauty blogger, beauty review, Beauty Vlogger, best lip gloss, best nude lip gloss, buxom white russian, buxtom white russian holiday kiss collection, Holiday Gift Guide, holiday makeup, Holiday Yay or Nay, leahtackles, leahtackles christmas, makeup blog, makeup review, Mom Makeup, nude lip gloss for every skin tone, sephora limited edition, stocker stuffer idea, teen makeup, teen stocking stuffer, women makeup, womens stocking stuffer, youtube

JAMBERRY NAIL WRAPS: TIPS AND REVIEW!

December 5, 2016 & Leave a Comment

Hi there! Happy Monday!

I hope that you had a wonderful weekend! My family made a HUGE ANNOUNCEMENT on our Vlog Channel KwapisFamilyTackles which was very emotional for us, but we feel good about our decision. Today I want to share a product with you that many of you have probably heard of, which are Jamberry Nail Wraps, and a product that I was very hesitant to even try. Stephanie, an independent consultant for Jamberry, reached out to me about trying some of the wraps for consideration for review and I flat out told her I didn’t think they’d work for me because I haven’t had luck with other similar wraps in the past. Stephanie was very understanding, but said she didn’t mind that I was hesitant and sent me some to try anyway.


JAMBERRY NAIL WRAPS

jamberry-nail-wraps-leahtackles-review.jpeg

What Are They?

Jamberry Nail Wraps are a solid film covering that you apply directly to your natural nail. The wraps are made with a special material that works with both pressure and heat activation to create a water tight bond. The wraps are art on your nails and you don’t have any drying time! They are also made in the U.S.A and contain no latex or harsh chemicals.

How Did They Work For Me?

I was NERVOUS to try these! I do my own nails, and I hate waiting for them to dry, but I wasn’t sure if I was up for learning a new nail process but I was very happy that Stephanie sent along great directions that were very easy to follow. I will say that don’t imagine that you are going to slap these on your nails and be out the door in a minute, because I did have to trim each decal to fit my nail, heat each decal quickly with a hair dryer, and then apply it to my nails BUT this was well worth the no drying time in my book! I also love the fun rose gold decals that I tried, but realistically I generally prefer more solid colors, so I was happy to see all sorts of different options available on both Stephanie’s Jamberry Facebook Page and Stephanie’s Jamberry Website. Once I got used to the “learning curve” of applying them, I will say that the process was pretty easy to do and the decals have so far lasted very well on my nails! Also, they have *adorable* styles for kids and I think these would make such precious stocking stuffers for kids, teens, and adults! Also, it’s nice to shop small with a mom trying to provide for her family.

Have you used these wraps? Tell me your thoughts in the comments! And please don’t forget to subscribe!

FacebookTwitterEmailPinterestShare

Filed Under: Beauty Tagged With: beauty blog, beauty review, Beauty Vlogger, huge vlog announcement, jam wraps, jamberry, jamberry nail wraps, jamberry review, leahtackles, LeahTackles Beauty, makeup blog, nail decals review, nail wrap review, stephanie hillyard jamberry

BEAUTYCOUNTER SAFER SKINCARE and MAKEUP | A REVIEW

November 28, 2016 & Leave a Comment

Hi there! Happy Monday! And Happy Cyber Monday to all of you shoppers out there! ; )

I hope that you had a wonderful (and hopefully long!) weekend! Today I am going to be sharing a review of BeautyCounter which is a skincare and cosmetics company that doesn’t use harmful chemicals and sources safer ingredients for all of their products. My good friend, Nicole, is a senior consultant for BeautyCounter and sent me several samples that I used for review purposes. As always all opinions are completely my own and this is not a sponsored post. BeautyCounter also has incredibly gorgeous packaging and amazing kits available for the holiday season!! If you haven’t heard of BeautyCounter, you can check out Nicole’s BeautyCounter website here. You can also see lots of fun BeautyCounter news and enter contests on Nicole’s Beauty Counter Facebook Page.


Nourishing Cream Cleanser

beautycounter-cleanser-leahtackles.jpeg

I was excited to try this, because I prefer very gentle cleansers and thought this sounded like a great one. It reminded me a little bit of my Philosophy Purity which is my “holy grail” cleanser. I will say that this doesn’t lather much, which is common for more natural cleansers, but it does leave my face feeling clean. I really enjoyed this cleanser, and would definitely consider purchasing it.

 Nourishing Day Cream

beautycounter-bestseller-daycream-leahtackles.jpeg

This day cream felt great on the skin and didn’t take too long to absorb into the skin which is always a biggie to me when I’m rushing to get ready in the morning. Having “nourishing” in the name did make me nervous, but I really enjoyed this cream. It didn’t find it to be greasy on my oily/combo skin but I can’t speak about how it would work in the warmer summer months.

Nourishing Night Cream

beautycounter-nightcream-review-leahtackles.jpeg

 Of all the things that I was sent by Nicole to try, THIS is far and away may favorite! A little goes a long way, and this feels like such a luxurious cream. Also, if you purchase the 1.65 Fl. OZ. costs $47 which compared to other night creams, such as Advanced Time Zone Night Age Revising Creme by Esteé Lauder, that retails for $75 for 1.70 Fl. OZ this is a good value. I only had a small sample, so I can’t speak to how it effected my skin over time, but I did love the feeling of it.

Purifying Charcoal Mask

charcoalmask-beautycounter-leahtackles.jpeg

If you watch our Daily Vlogs you *probably* have seen me in a face mask, because I use them several times a week, so I was very excited to try this mask! I absolutely loved it! This mask is nice because you only need to wear it for 10 minutes, and then rinse with warm water. You can also use this as an overnight treatment. I love this because it helps to absorb excess oil

Tint Skin Foundation

beautycounter-skintint-review-leahtackles.jpeg

I tried a sample of this foundation in porcelain and I have high expectations when it comes to foundation so I was interested to see how this stacked up. I wore this a couple of times and I didn’t like it without primer underneath, but that said there are foundations that are some my absolute favorites that I don’t wear without primer because I don’t like the way they settle into my pores. However, when I used my Benefit Porefessional Primer and then applied this I loved it! It was light coverage, but I was able to build it up to a medium coverage in areas where I needed it.I found this to be easy to blend it, and it didn’t oxidize on my skin.  I think this would make an awesome every day foundation, and also a great pick for those who prefer BB Cream, CC Cream, or just a lighter look.

Nice Do Kids Shampoo

beautycounter-kidsshampoo-leahtackles-review.jpeg

I really liked this shampoo for my three kids! My husband, who is usually in charge of the kids bath time, said that this worked well and rinsed out easily. I love the way that it smells. I really appreciate knowing that this is a safe product without harmful chemicals for my kids, especially because one of my sons has extremely sensitive skin.

Kids Not a Knot Conditioner

kidsnotaknot-beautycounter-leahtackles.jpeg

This stuff smells so awesome!! I love it for both  my daughters long hair that is constantly in tangles, and for my son who has very dry hair. I would definitely keep repurchasing this!

Have you tried any goodies from BeautyCounter? Do you try to shop for less harsh skincare and beauty products? Let me know your thoughts in the comments! Also, you can now find BeautyCounter displays at select Target stores! I saw one recently and was very excited! Thank you for reading and have a beautiful day! xx

FacebookTwitterEmailPinterestShare

Filed Under: Beauty Tagged With: beauty blog, Beauty Counter, Beauty Counter Day Cream, Beauty Counter Skin Tint, beauty review, beauty tips, Beauty Vlogger, beauty youtuber, BeautyCounter Kids Line, BeautyCounter Kids Shampoo, BeautyCounter Makeup Review, BeautyCounter Night Cream, BeautyCounter Not a Knot, BeautyCounter Review, BeautyCounter Skincare Review, leahtackles, makeup blog, Natural Makeup, Natural Skincare, simple beauty, skincare blog, skincare review

« Previous Page
Next Page »

SUBSCRIBE

Leave your email to subscribe!

SEARCH

SPONSORS

ARCHIVES

GRAB MY BUTTON


copy & paste code

site design by The Kinch Life Design & development by Olive & Ivy Design