Leah Tackles

  • Home
  • About
  • Policy
  • Beauty
  • Fashion
  • Cooking
  • Exercise
  • DIY Projects
  • Decor
  • Book Club
  • Family

MY 5 MOST USED EYE BRUSHES | THE EYE BRUSHES YOU REALLY NEED!

May 23, 2018 & Leave a Comment

Hi there! Happy Wednesday!

I hope that your day is off to a fantastic start! Thank you for being here and taking time out of your day to read : )

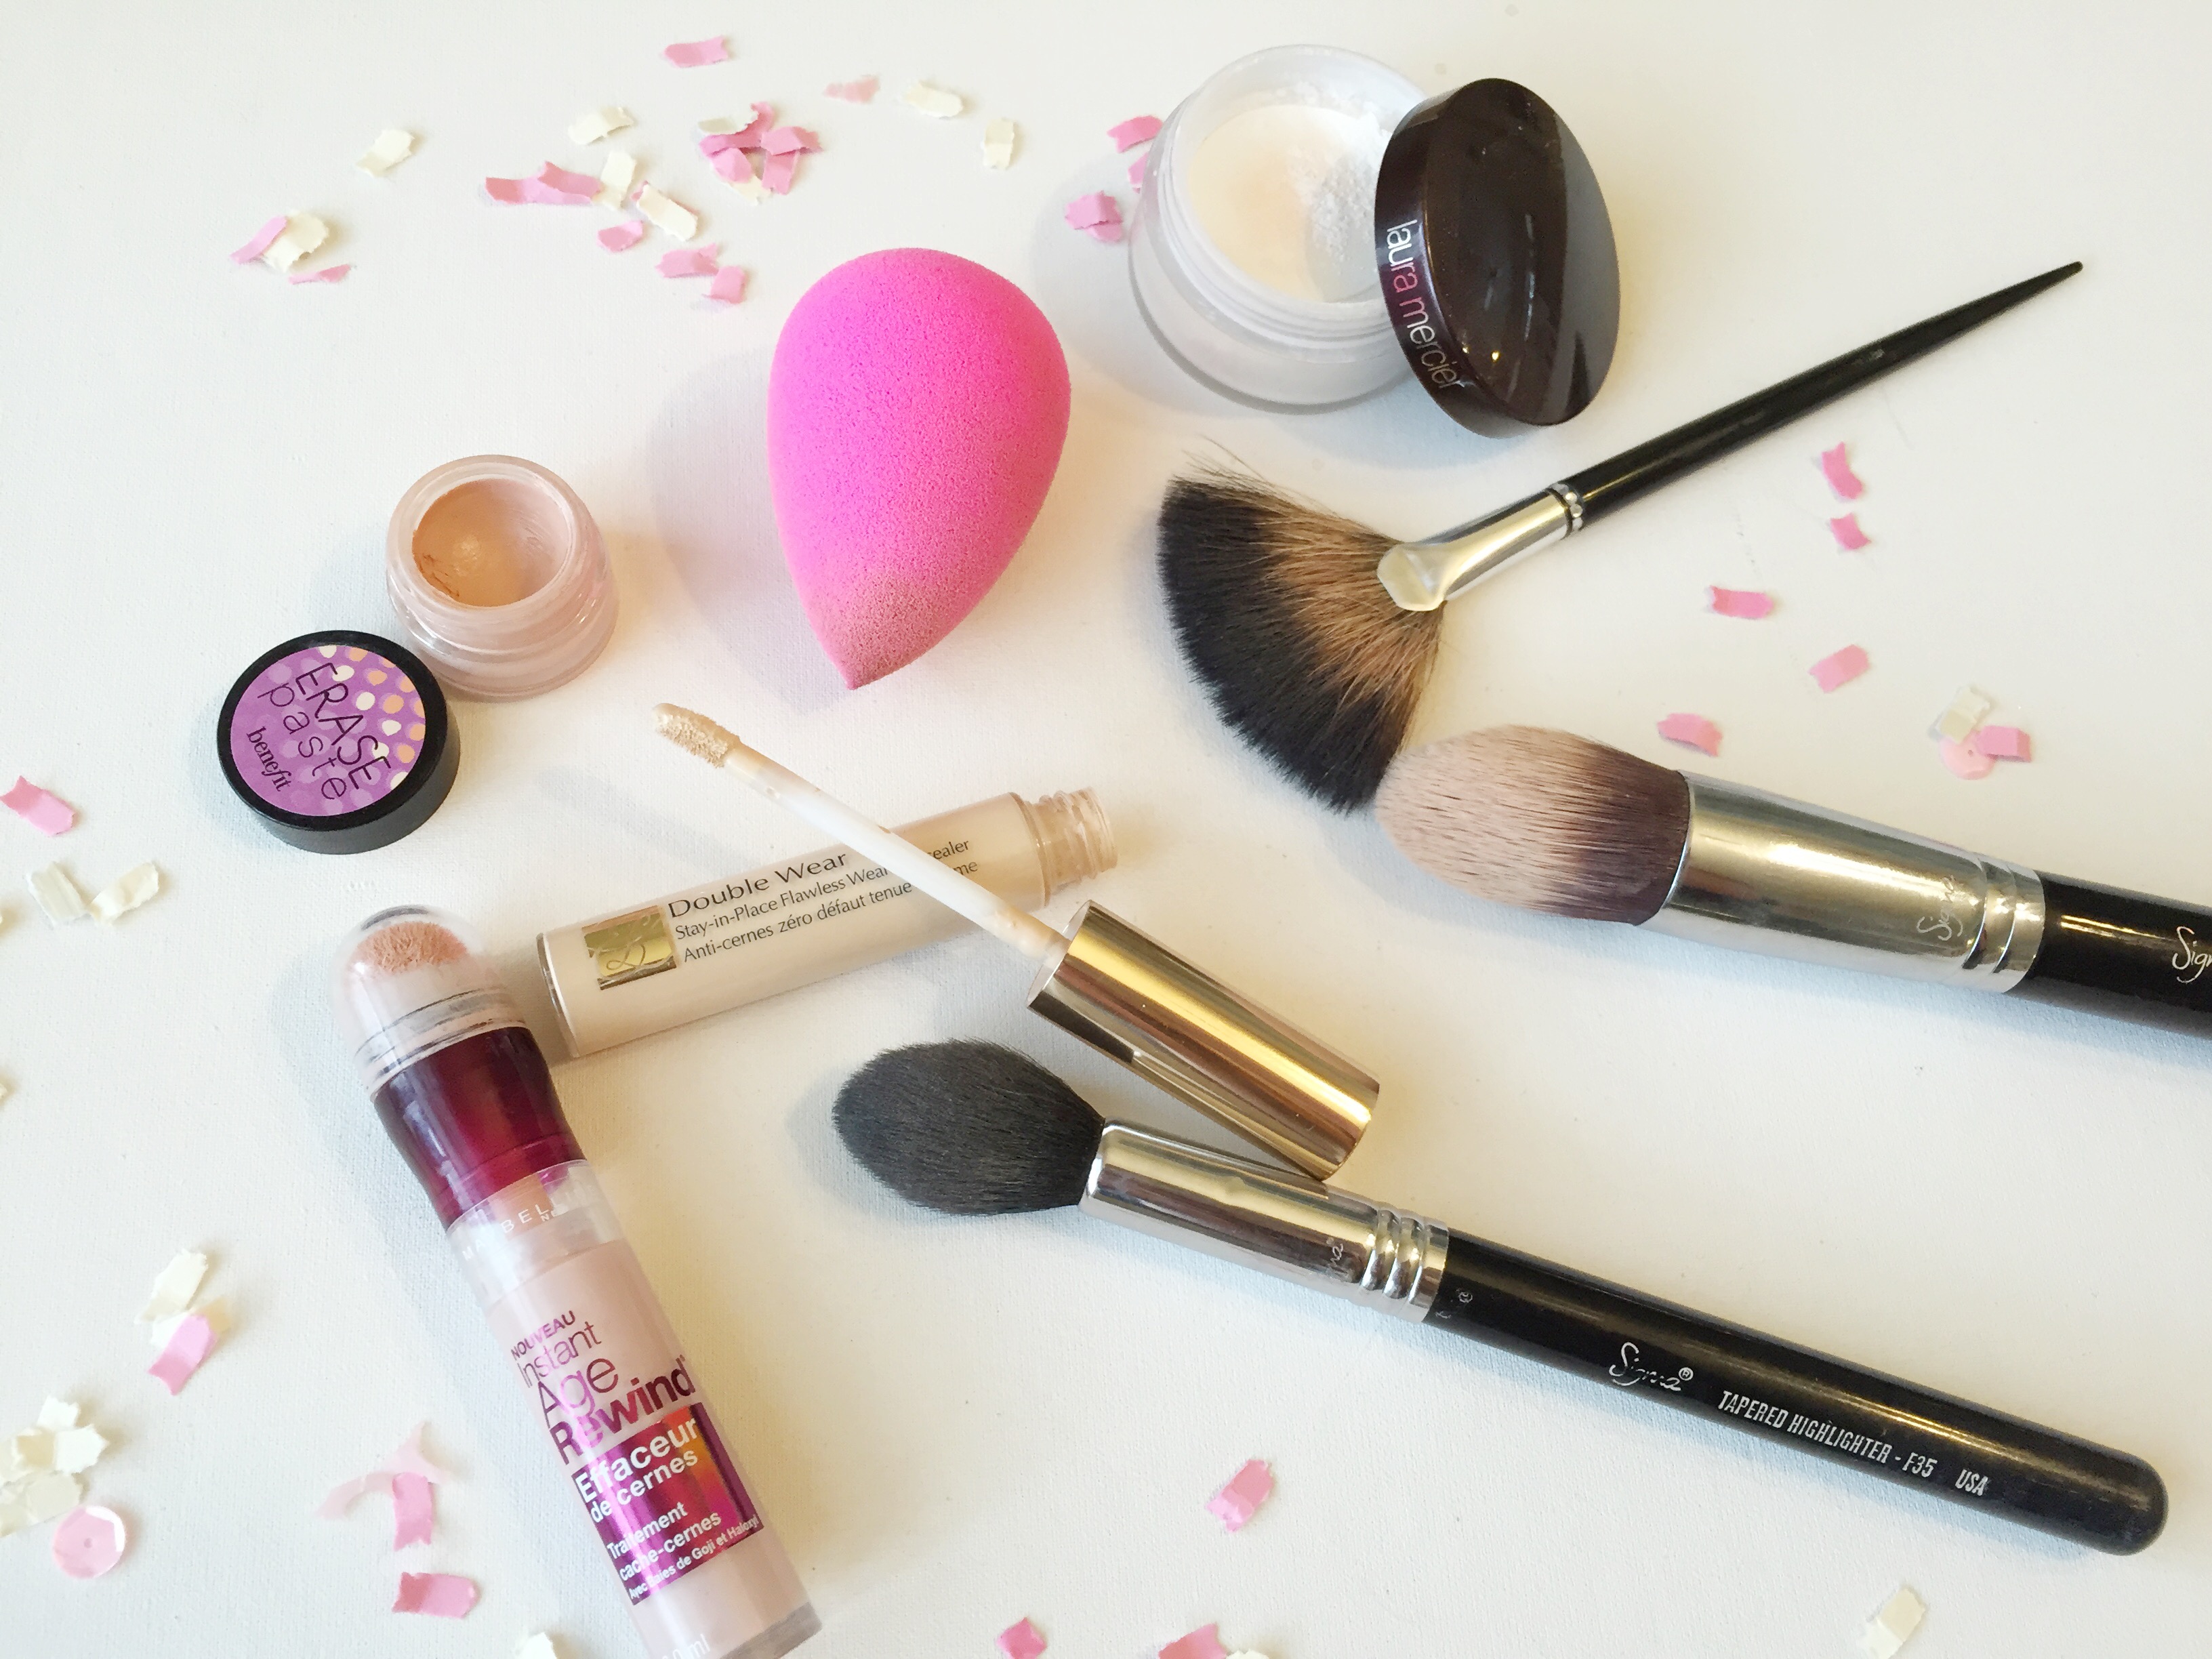
I often get messages from people who are looking for basics to get them started using makeup but understandably feel overwhelmed because of the huge amount of choices and information on products. I get a lot of questions about eyeshadow, and I often find that people own a few palettes, often barely used, so I thought sharing my 5 most used eyeshadow brushes. If you find this post helpful, please use the social media buttons at the bottom of this post to share it!

*Note: You’ll notice I love my Sigma brushes, which I’ve spoken about many times in the past, but that is because I have had some of them for nearly five years and they’re still in my daily rotation!


Sigma E60 Large Shader

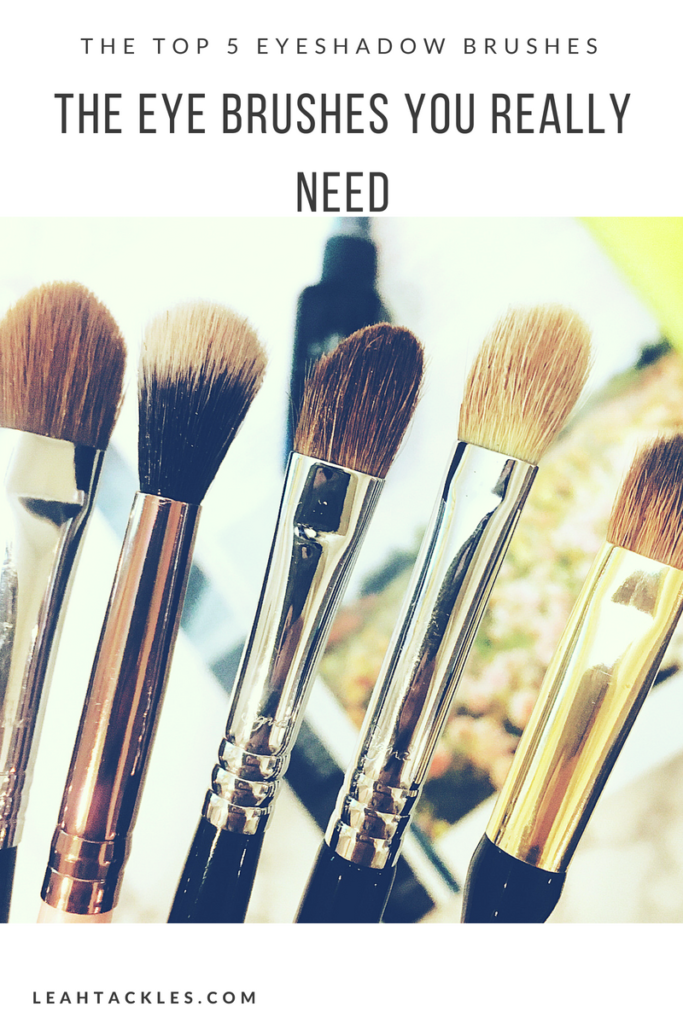
I use this brush to put the shadow under the brow bone and all over the lid.


Luxie 205 Tapered Blending

I use this brush to put eyeshadow in the crease in a windshield wiper motion. I like this brush because it is soft but not so fluffy and soft that you can’t get the shadow where you want it. I linked a Luxie brush set above, but here is the brush individually.


Sigma E70 Medium Angled Shading

I use this brush to put the shadow on the outer v of the eye, where I focus the darker colors.


Sigma E25 Blending

This is THE BRUSH I use for all of my blending! This shadow makes blending a breeze. I have several and use it daily. I also have one of these brushes that I use for contouring my nose with bronzer.


Sonia Kashuk Tools No. 07

This is a tiny shadow brush that is fantastic for putting color on the lid or under eyelash line. This is a great brush because it is small so you can deposit the color exactly where you want it. Here is the new version (same brush, different look).


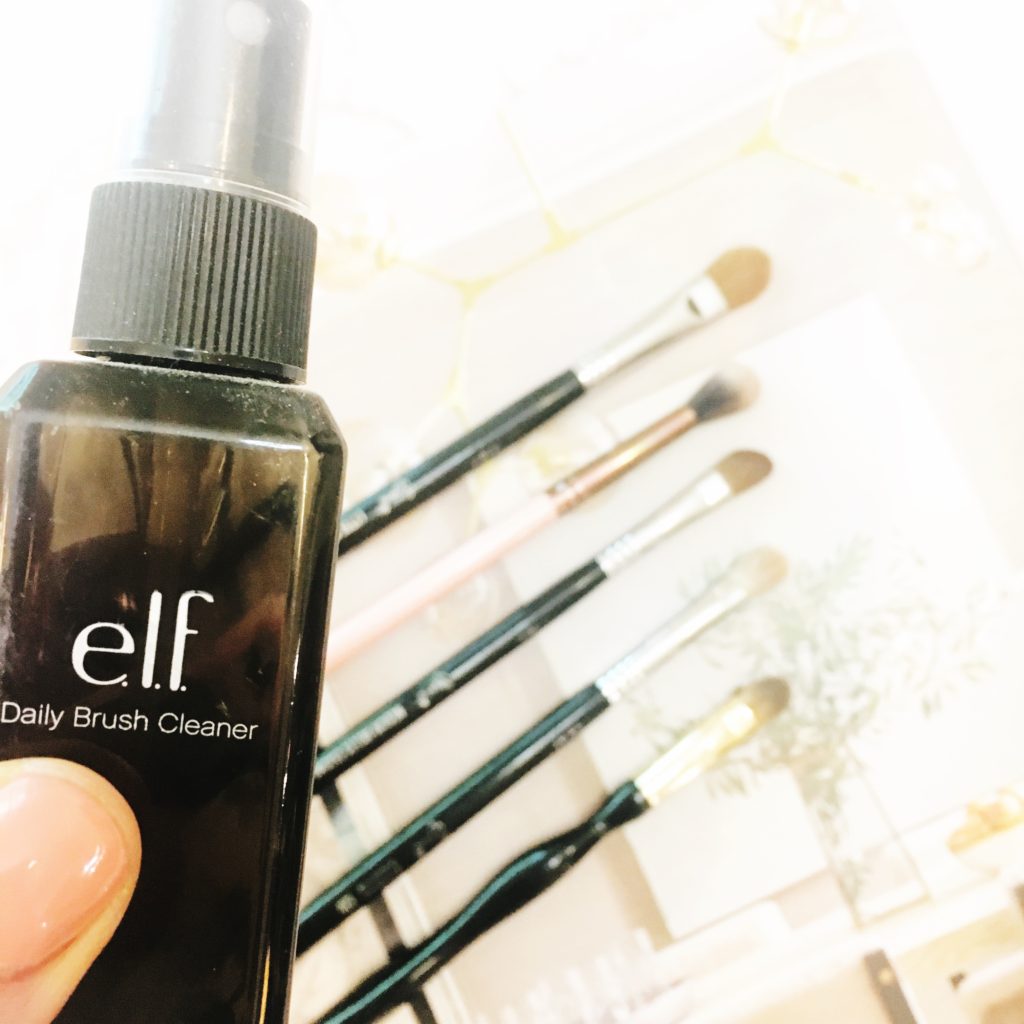
I love using my e.l.f Daily Brush Cleaner to clean off my eye brushes, especially if I’ve used a dark color or a bright color, between my weekly deep cleaning of my brushes. I spray my brushes and then lightly wipe them on a cloth or paper towel.


Shop


What is your favorite eyeshadow brush? I would love to hear what you love! If you comment, others can learn too : )

Have a safe and fun weekend! xx


Watch My Latest YouTube Video 

FacebookTwitterEmailPinterestShare

Filed Under: Beauty Tagged With: 5 best eye brushes, eye shadow brush basics, LeahTackles Beauty, luxie brushes, Michigan Beauty Blogger, my most used makeup brushes, sigma 360, Sigma Beauty, sigma e25, sigma e70, sonia kashuk small eye shadow brush, the best eye brushes, the best eyeshadow brushes, the five eye brushes you need, what eye brushes do you really need, what eye shadow brushes are for what

IS YOUR UNDER EYE CONCEALER MAKING YOUR FINE LINES AND DARK CIRCLES MORE VISIBLE?

January 25, 2016 & Leave a Comment

Hi there! Happy Monday!

This morning I was thrilled to be volunteering in my 4 year olds classroom for a few hours, and her sweet teacher asked me about under eye concealer suggestions. First of all, thank you for asking! I absolutely love getting questions from all of you, and every time I take it as a compliment! So, ask away! I am also a huge fan of this topic, because I have (BAD) dark circles! I’ve talked about it before, but the combo of three kids under five and genetics (love ya mom and dad!) makes my dark circles situation rough most days. I also think it’s a super important topic because if you don’t apply or set your under eye concealer correctly it can cause the makeup to set into your fine lines making the lines and dark circles more visible! Let’s be real, none of us have time for that!

What I Do For My Under Eye Make Up and Dark Circles:

UNDEREYECONCEALERTIPS-DARKCIRCLETIPS-LEAHTACKLES.jpeg

1. If you’re not using an eye cream, you should be! I really love using the Benefit It’s Potent Eye Cream which you can find at Ulta or Sephora. It’s a little pricy, but I really like this and it has helped my dark circles to appear less drastic. I also like this because it doesn’t take forever to absorb into the skin, and it doesn’t feel heavy at all.

2. I always use some sort of pinky/salmon concealer to brighten up the dark circles under my eyes. My go-to favorite is a drugstore concealer! I use the Maybelline Instant Age Rewind Eraser Dark Circles in Brightener! Make sure you get the one that actually says “Dark Circles” because they also have a regular concealer that isn’t specific to the under eye area. I also really like the Benefit Erase Paste, it works so well on days when I want maximum concealing power, but it’s thicker and harder to work with when I’m in a real hurry.

3. I then use a concealer (Tip: Look for one that is one shade lighter than your skin tone for extra brightening power! But I am very fair so I just get the lightest shade offered) over the brightening concealer from step 2. I really love the Estée Lauder Double Wear Concealer or the It Cosmetics Bye Bye Under Eye! I like to make a triangle under each eye and then use either a damp Beauty Blender, or my Sigma F86 Tapered Kabuki Brush (any makeup sponge similar to this or tapered kabuki brush will work) to pat and lightly press the concealer into the skin. Don’t drag the brush in a painting motion! You want that product to stay there!!

*Note: Sometimes I go from step 2 to step 4 and skip this step altogether, but most days I include this in my routine.

4. I then ALWAYS set my under eye concealer with a loose setting powder, preferably a brightening setting powder, with my Sigma F35 Tapered Highlighter (or a fan brush works wonderfully too!).  By setting your under eye concealer with a powder you are helping it to stay put, and also avoiding the risk of the product settling into your fine lines or wrinkles. I love the Laura Mercier Secret Brightening Powder or for a much less expensive route, the E.L.F High Definition Under Eye Setting Powder is also fantastic! Who can beat $3?!

If You Enjoyed This Post You May Also Enjoy:

My Top 3 Ways To Apply Liquid Foundation

I hope that this was helpful! If it was please subscribe, share, or “pin” onto your Pinterest account! I have share buttons for social media at the bottom of each post : ) Have a wonderful week! Let’s chat again on Wednesday! xo

FacebookTwitterEmailPinterestShare

Filed Under: Beauty Tagged With: beauty blender, Beauty Reviews, benfit erase paste concealer, Cover Up Dark Circles, Diminish Fine Lines, Easy makeup tips, estee lauder double wear concealer, laura mercier secret brightening powder, leahtackles, LeahTackles Makeup, Lifestyle Blogger, makeup blogger, makeup tips, makeup videos, maybelline age rewind dark circles, mommy blogger, Sigma Beauty, Under Eye Concealer Tips, Under eye makeup help, Youtuber

Are You Making These 5 Makeup Mistakes?!

June 8, 2015 & 4 Comments

Hi there! Happy Monday!

I hope that you had a great weekend! First things first, MICHIGAN readers have you entered to win the LivnFresh Detroit D shirt I’m giving away? It’s perfect for any Tiger fan! You have a few hours left to enter. You can enter on the LeahTackles Facebook page, and entering is easy : )

Now, I decided to talk about 5 makeup mistakes that are VERY common! Now, I am not claiming that I don’t make plenty of makeup mistakes, but I know that I make a lot less than I used to. So, today I am sharing 5 things that you should make sure you’re not guilty of.

*Note: These are *my* opinions and of course if you really enjoy what you’re doing or one of these makeup “mistakes” then please understand that I mean no offense to you and you should do whatever makes YOU feel beautiful! xx


5makeupmistakes-leahtackles.jpeg


#1 Using Expensive Makeup With Cheap Brushes

It took me YEARS to invest in nice makeup brushes. I didn’t own any brushes, except for the brushes that came in kits or that I found in tiny cheap kits at the drugstore, until after college. FOR SHAME : ( Using good brushes helps for your makeup to look better, period. I suggest starting with a kit, Sephora has some basic but get-the-job-done kits, and I love the sets from Sigma Beauty.

#2 Not Blending Your Eye Shadow

Just because you know to put a brow bone highlight, lid color, and crease color doesn’t mean your look is compelte, girl! BLENDING is your bff! Use a clean blending brush, and it will turn your amature eye makeup skills into art. My favorite blending brush is the E25 from Sigma.

#3 Too Much Dark Eye Liner On Lower Lash Line

Just. Say. No. This should not be an everyday look. Or at least please smudge it out. I did my fair share of this in high school, but seriously just try skipping it, or just doing your top lashline and waterline, because the difference is HUGE! It will open up your eyes and make your eyes look bigger.

#4  Ignoring Your Eyebrows

Yay for beautiful, groomed but not over plucked, filled in brows!!! I am so glad brows are back! On days where I wear no other makeup, I still like to fill in my brows and throw on some lipstick. Even if you just use a tinted brow gel, do not ignore your brows! Also, do not overpluck or let someone do too much waxing on your brows.

#5 Sleeping in Your Makeup

I did this all through college multiple days a week (days I went to a party or the bar, let’s be honest) and my skin was beautiful. Well guess what? Now I’m in my late 20’s and I want to keep my skin as beautiful as possible for as long as possible, so washing off your makeup is essential.  At the VERY LEAST use a makeup removing wipe ( I like these ones from Neutrogena). I have timed it, I can use a makeup remover, wash my face, use a toner, moisturizer, and eye cream in about 3 minutes. And it just FEELS clean.

Do you agree with these makeup mistakes? What makeup mistakes do you admit to making or have you made in the past? If you like these types of posts, please let me know in the comments and don’t forget to share! Thank you so much!!

FacebookTwitterEmailPinterestShare

Filed Under: Beauty Tagged With: 5 makeup rules, 5 makeupmistakes, BBlogger, beauty blogger, beauty tips, leahtackles, LeahTackles Makeup, makeup, makeup mistakes, makeup rules, makeup tips, Sigma Beauty

My Top 3 Ways To Apply LIQUID Foundation!!

September 1, 2014 & 2 Comments

Hi there! Happy Monday!!

I received a request to talk about the correct way to apply liquid foundation and today I am going to share my top 3 ways to apply it. I want to also say that I am not a professinal makeup artist…but I do play around a lot with different makeup, make up brushes and applicators, read blogs and watch videos on makeup a lot…so there is that ; ) If you have any questions or requests, please never hestitate to reach out to me! I would LOVE some more participation from my readers!!


mytop3waystoapplyliquidfoundation.jpeg

#1 Stipple It On!

I LOVE LOVE LOVE to stipple on my foundation!! To stipple means to dot and that is exactly what you do with this technique!  You dot on the foundation instead of brushing the foundation on. Stippling on your foundation gives a beautiful diffused finish because the foundation doesn’t go into lines or scars as easily, but rather brushes over them for a beautiful flawless appearance.

What I Do:

I put a little bit of foundation on the top of the hand that I won’t be holding the brush with (so in my case my left hand) between my thumb and pointer finger. I use the pointer finger of my right hand to dot foundation on the area of my face I want to start with because I like to work in sections. I work in sections because if I dotted foundation all over my face some of it may begin to set before I’ve gotten to it. I stipple the foundation onto my skin by making quick dotting motions up and down to get the perfect finish.

What I Use:

My absolute favorite stippling brush is the F50 Duo Fiber from Sigma Beauty. This brush is sold individually as well as in sets. I use this brush so often that I have two so that it’s in constant rotation even when I’m washing some of my brushes. This brush can also be used to apply cream or liquid blush and bronzer.

#2 Traditional Foundation Brush

When I first started out this is the technique I used, and it’s still a great option. I think that this is a great way when you are first starting out with makeup or with liquid foundations. Using a traditional foundation brush can cause streaking, which nobody wants, but as long as you make small strokes it can be fairly easily avoided.

What I Do:

I put the foundation onto my hand just like I described above, but this time I use the brush to brush on my foundation as if I was painting. I am careful to use very short strokes, and change the direction of the brush as I go. Changing direction when using a foundation brush like this helps so that it isn’t all strokes going the same way which can look streaky.

What I Use:

The foundation brush I use the most frequently is my F60 Foundation Brush from Sigma Beauty, but I also have had great luck with foundation brushes similar to this from Real Techniques, Tarte, and Sephora’s brush line.

#3 Beauty Blender Sponge

I am sure by now almost all of you have tried this sponge, and if not you have probably at least heard about it! This is a GAME CHANGER for me!! It is completely worth the price! This allows me to build up the coverage as needed and you can never see the foundation (a big no-no!)…all you see is beautiful skin that looks airbrushed.

What I Do:

I like to lightly dampen the sponge before using it. I use the round end to apply foundation to my chin, cheeks, nose and forehead. I use the pointy end to apply foundation to harder to reach places like my under eye area and around my nose. I both dot and blend the sponge to get the perfect seamless look.

What I Use:

I have only used The Original Beauty Blender but I know there are lots of other imitators flooding the market now! I have read and watched lots of reviews, and the only sponge that seems to stand up to Beauty Blender is the Miracle Complextion Sponge by Real Techniques. The Real Techniques sponge is about 1/4 of the price of the Beauty Blender, so that might be a great option for some people. If you would like to see me do a comparision sponge on any of these sponges, let me know! Also, if you have tried any that you love (or don’t love!!) let me know in the comments!!

I hope that this post was helpful! Please take a minute to subscribe if you haven’t already! Just enter your email into the box on the right side of this page and you’ll get an email to confirm your subscription!! It will make my day : ) :  ) If you have ANY questions please let me know and have a fabulous day!!

FacebookTwitterEmailPinterestShare

Filed Under: Beauty Tagged With: beauty blogger, Beauty Sponge, Foundation Tips, How to Apply Liquid Foundation, leah tackles, Lifestyle Blogger, Liquid Foundation, makeup tips, Sigma Beauty, The Original Beauty Blender


SUBSCRIBE

Leave your email to subscribe!

SEARCH

SPONSORS

ARCHIVES

GRAB MY BUTTON


copy & paste code

site design by The Kinch Life Design & development by Olive & Ivy Design

Catch The Webinar Replay! Boundary Setting For Entrepreneurs

Go to leahtacklessocial.com and sign-up for the link!